Teacher's Guide: Web Pages 101
Overview
The Web Pages 101! lesson formally introduces HTML and instructs students to create simple fixed-content web pages using HTML and CSS. Knowledge of these two web programming languages is essential for harnessing the full power of JavaScript in a web-programming context. In particular, this lesson will provide students the necessary foundation in HTML to understand the workings of GUI events, including features such as event propagation.
More about the lesson
Web-programming languages
JavaScript, HTML, and CSS are three languages which together form the basis of client-side web programming tools. These languages are designed to interact, but they are distinct, with each playing its own specific role.
JavaScript is an example of a programming language. The purpose of a programming language is to provide a way for humans to communicate instructions for a computer to follow to perform specific tasks or computations. HTML and the CSS language, in contrast, lack the logic and computational capabilities of a full programming language such as JavaScript.
HTML is an acronym for hypertext markup language. A markup language is a system of annotating a document to describe its structure, including the relationships among its parts, and (potentially) to convey the semantic meaning or context of different parts of the document. In the case of HTML, the annotations consist of tags, such as <h1></h1>, <p></p>, and <img>, to define correspoding page elements—i.e, headings, paragraphs, images, and so on—which together make up the entire document.
CSS is short for Cascading Style Sheets. A style sheet is a computer language that controls the layout, design, and formatting of structured documents such as HTML. Web browsers use CSS to determine how to render the elements of an HTML document on screen. CSS determines the color, font, and size of text; the size, positioning, and spacing between page elements; and much more. All HTML page elements have default CSS settings. When we add our own CSS rules, we override the default CSS settings to achieve our own desired result.
Up to this point in this curriculum, students haven't previously interacted much directly with any of these three languages. The main focus has been instructing them to program in CoffeeScript, a syntactically simple variation of JavaScript. CoffeeScript's simpler syntax makes it easier to use than JavaScript. However, web browsers don't run CoffeeScript directly. Rather, CoffeeScript code must first be compiled into JavaScript. That is, after a CoffeeScript program is written, it must be converted into JavaScript in order for the program to run in a web browser. One of the really helpful features of the Pencil Code coding platform is that the pencilcode.net server does the compiling behind the scenes every time a user runs a script. Thus, even though students don't actually code in JavaScript, their work seamlessly results in the creation of JavaScript programs.
Though this course hasn't instructed students to code in JavaScript, it has directed them to interact, albeit indirectly, with aspects of HTML and CSS. Beginning with the Label Recycling! lesson, students have made calls to the jQuery function (often via its alias, $) to select HTML page elements. They have also made use of the jQuery css method to set style sheet properties. For example, students may well have coded statements such as $("body").css backgroundColor:blue, thereby selecting the HTML body element and changing its style attribute using the CSS background-color property.
The goal of this lesson is for students to learn more about fixed-content web pages, which are pages that consist solely of HTML and CSS. Truth be told, the main focus is HTML, but HTML by itself is fairly boring. Mixing in CSS makes working with HTML a lot more interesting!
HTML
This curriculum first discussed HMTL in the Notes to the Format Labels! lesson. As noted there, an HTML document consists of page elements of various types. There are scores of element types, with often rather nuanced purposes. However, beginning students need knoweldge of only a handful of elements to get started with a web page. The elements introduced in the lesson, and one or two more discussed in the remainder of this section, should suffice for now. (For a complete listing of page elements, reference mdn web docs.)
HTML elements are arranged to form a tree-like structure, much like an outline for a written document. Many elements can contain other elements. When writing HTML files, it is customary to indent tags that are nested within other tags, as illustrated in the lesson's coding snippet (repeated below). The result is a marked up document that mirrors the hierarchical structure of the page.
<html>
  <head>
    <style>
      li {color:red;}
      h1 {color:teal;}
    </style>
  </head>
  <body>
    <h1>Constructors</h1>
    <ul>
      <li>Turtle</li>
      <li>Sprite</li>
      <li>Pencil</li>
      <li>Piano</li>
    </ul>
  </body>
</html>
An HTML document's hierarchical structure naturally lends itself to being illustrated using a tree diagram, as illustrated here:
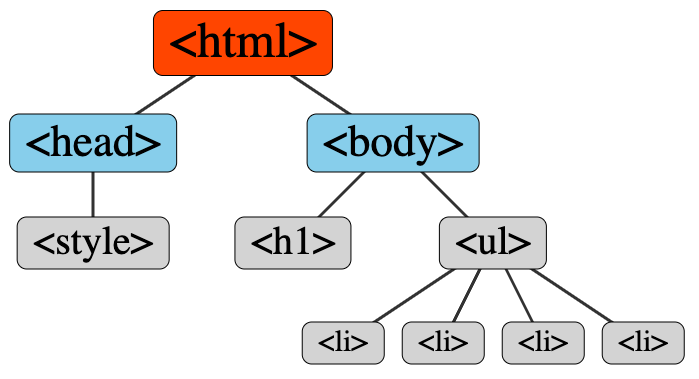
Relationships between HTML page elements are described in "familiar" terms, such as parent, child, sibling, ancestor, and descendant. The html element is the top-level element of an HTML document, forming the base of a structure that branches out from it. The html element is therefore referred to as the root element. All other elements are descendants of the root. The body element falls directly under the html tag, and so is therefore a child with respect to html. body contains all visible content on a page; it is the ancestor of all page elements that it contains. A list consists of a list container (such as ol and ul for ordered and unordered lists, respectively) and individual list items (li). The container (ol or ul) is the parent of the list items (li). The list items are all siblings to each other and children with respect to ol or ul.
Note that the hierarchy of an HTML document is used by both CSS and Javascript. In fact, the term cascading in CSS refers to the fact that a style applied to an element will (generally) also apply to all of its descendent elements (i.e., cascading down the tree structure illustrated above). For example, if you change the default style attribute of body to include color:blue;, all headings, paragraphs, and other text elements will also render in blue, unless you override the cascading attribute by setting the style attribute for the descendant.
When a web page loads, the browser creates a special object called the document object model, or DOM, which JavaScript uses to navigate the page in order to identify and manipulate different page elements. As the next lesson will discuss, the DOM is a critical link the browser provides between JavaScript and underlying computer events such as key presses and mouse clicks.
HTML elements are coded with tags. The structure of an HTML tag will differ based on whether it can or cannot have children nested in it. Elements which can have no descendants, termed void, are coded with a single tag. Void elements are typically used to insert or embed something in the document. For example, the following <img> tag adds the frog.jpg image to the document, setting its width to match the width of the browser window:
<img src="frog.jpg" width="100%">
The additional information included in the <img> tag, e.g., src="frog.jpg", are examples of element attributes. These space-separated name/value pairs provide information about and functionality for the element.
Technical note: HTML attribute values which don't contain spaces do not need to be inclosed in parentheses. Thus, for example, src=frog.jpg is a valid alternative to src="frog.jpg". However, it is considered best practice to include parentheses.
Elements that can have child elements (formally referred to as non-void elements, though more commonly called container elements) are coded with tags that consist of two parts: an opening tag and a closing tag. In common parlance, this pair of tags is collectively referred to as "the tag". Moreover, container tags are typically referenced using just the opening tag, i.e., <p> rather than <p></p>.
Between a container element's two tags appears the element's content. Content can consist of plain text and/or it can define nested HTML elements (i.e, descendants). In the following example, the <p> tag contains text with an embedded <em> tag (used to denote text content that is intended to be rendered with emphasis). em is itself a container element, but the tag's content includes only text.
<p>Example <em>paragraph</em> tag.</p>
Armed with this understanding of individual elements and tags, we now return to a discussion of how elements combine to form a page. As the lesson's coding snippet illustrates, the outermost elements in an HTML document are html, head, and body. Each appears only once in the document. The html element contains all other page elements, and for this reason is referred to as the document root. Nested immediately with html are the head and body elements, in that order.
<html>
  <head> </head>
  <body> </body>
</html>
The document head is used to provide information about the document but which does not directly appear in the browser window. This information is included in head through a handful of special element types nested within it. The style tag is one of these special elements, used to specificy CSS rules (as discussed in the lesson). The following example illustrates the use of meta tags to provide additional information about the page. This metadata (data about the data contained in the document) helps the browser to correctly render the page and provides keywords that could be useful for internet search engines.
<head>
  <meta charset="UTF-8">
  <meta name="description" content="PencilCoder notes">
  <meta name="keywords" content="HTML, CSS, body, style">
  <meta name="author" content="Andrew Petusky">
</head>
The body element contains all of the visible content of your web page. It is perfectly acceptable to add text directly to the <body> element. However, it is more common to see page content contained in other elements which are themselves nested within body.
<html>
  <body>
    This is where all of your visible content goes.
    <p>Content is typically contained in nested elements.</p>
  </body>
</html>
Use of additional page elements within body provides additional information about document content. In this lesson, students will capitalize this embedded information for layout and formatting purposes. However, there are many other potential benefits to marking up documents using HTML tags in this way (discussed below).
The lesson snippet introduces the h1, ul, li, and p tags. These are examples of semantic elements: they clearly describe their meaning to both the browser and the developer. This limited subset of semantic elements should meet most students' need for the purposes of this lesson, as they will not be developing large or complicated pages. See this w3schools reference for a more complete listing of semantic elements.
Non-semantic elements, as the term implies, convey nothing about their content. The two most commonly used non-semantic elements are div and span. These are general-use container (i.e., non-void) tags, used to provide additional levels of structure when no existing semantic elements matches the need.
Technical note: The primary difference between div and span elements is their default CSS display settings. <span> has a default display value of inline; <div> has a default value of block. (The CSS display property will be discussed in the Beyond the Lesson section of these notes, below.)
div and span tend to factor prominently in HTML documents because together they are used whenever there is no semantic element suitable for a given need. For this reason, <span> and <div> are known as the "tofu of web development": they have no real flavor but you can do virtually anything with them!
When using a non-semantic element, "best practice" is to add a class attribute to describe its semantic purpose. For example, the following snippet uses a span element to identify content within a paragraph for which a semantically-specific tag does not exist (i.e., there is no <name> tag):
<p>Hi, my name is <span class="name">John Doe</span><p>
A final, but crucially important point regarding HTML regards the treatment of white space in the source code. Browsers condense multiple whitespace characters (including newlines) to a single space when rendering. Hence, the term WYSYWIG (what you see is what you get
) certainly doesn't apply to HTML source code when the browser renders (i.e., displays) it on the screen!
Cascading Style Sheets (CSS)
CSS is the stylesheet language used with HTML. CSS gives control over the color, font, and the size of text, the spacing between elements, the positioning and ordering of elements on screen, elements' borders, background colors and background images, and much more. This curriculum first introduced CSS in the Format Labels! lesson, delving much deeper into the topic in the notes to that lesson.
The basic building blocks of CSS are property/value pairs that identify a stylistic feature (such as background-color) and a value for that feature (e.g., black). Formally, these property/value pairs are called CSS declarations.
When coding CSS, we define rulesets—frequently just called rules—that associate page elements with CSS declarations. In previous lessons, students applied CSS rules programmatically using jQuery, e.g.:
$("body").css backgroundColor:blackThis lesson instructs students to code CSS rules using pure CSS. These rules consist of two parts. First, there is a selector (or group of selectors). Selectors are used to specify the element or elements to which the rule will be applied. Second, there is a declaration block. This is a list of CSS declarations contained within curly braces.
The following example code includes four CSS rules. The first is equivalent to the jQuery css method call shown above. The second sets the font-weight, font-family, and font color properties for all paragraph and list item elements. The latter two CSS rules illustrate the use of CSS class selector syntax and id selector syntax (introduced in the Calling All $("turtle")s! and Label Recycling! lessons). The former rule applies its declarations to all page elements with a class attribute of name; the latter applies its declarations to the element with id constructors.
body {background-color:black}
p,li {font-weight:bold; font-family:tahoma; volor:red;}
.name {font-style:italic; color:purple;}
#constructors {font-style:italic; color:purple;}
Note that CSS rules don't necessarily apply only to the element or elements directly specified by the selector. Rather, as noted above, they (generally) apply to—a.k.a., cascade to—all descendents of each element selected.
The lesson introduces two ways to add CSS rules to an HTML document. The lesson's coding snippet illustrates that CSS rules can be defined in a style element in the document head. The second approach is introduced in the lesson activities. In that case, CSS rules are defined in a separate file and applied to the current page using a link element. Regardless of which of these two approaches you choose, the syntax for defining a CSS rule is the same.
The following example illustrates that a single HTML document can include multiple page elements to apply CSS rules. As the lesson notes, these elements must appear in the document head.
<head>
  <style>
    body {
        font-family: monospace;
        color: red;
        background-color: black;
        padding:25px;
      }
  </style>
  <link rel="stylesheet" href="styles.css" >
</head>
A few things to note about the link element: link is void element, meaning it needs to be coded using a single tag. The element attributes rel="stylesheet" and href="styles.css" provide the browser information needed to find and load the externally-stored CSS rules. rel stands for "relationship". Its value denotes how the item being linked to is related to the containing document. href stands for hypertext reference, which points to an external file. In this example, the reference is a simple filename, indicating it is saved in the same folder on the web server as the HTML page. A file located elsewhere on the server (or even on a different server)can be identified using relative or absolute paths, a feature explored in the Beyond the Lesson section, below.
Notes to activities
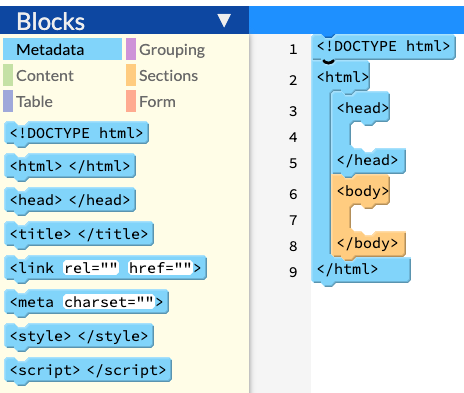
Students are instructed to create files with .html and .css extensions. For HTML files, this will cause the Pencil Code editor to show an HTML blocks in the coding palette.
Adding the .css extension to a Pencil Code filename will cause the editor to turn into a basic text editor, though it adds highights for CSS property names and recognized values.

Note that the Pencil Code editor includes options to add HTML and CSS panes to go alongside the standard coding pane. This is a useful features, in that it mimics the typical setup of writing three separate files for a website (html, css, and js), without having to go to the trouble of actually doing it, and it facilitates being able to view all three in a single window.


Convenient as this feature may be, students should be discouraged from using it during this and the following lesson. The first concern is that the three-pane editor interface obscures the underlying interactions between the different components of the web page. Most importantly, it eliminates the need to include either a <style> element explicitly in the document head, while also not requiring the use of a <link> tag to connect to an externally-defined CSS resource. An additional drawback to using the three-pane editor to define a web page is that the resulting HTML that is generated and rendered in the browser does not match the HTML structure defined in the HTML pane. Pencil Code adds in many other elements, which can lead to unexpected and frustrating results.
The index.html program is intended to introduce the basics of HTML. Of the mentioned HTML element types, list elements are apt to be the one that will require more explanation. If necessary, encourage students to follow the lesson's link to the w3schools HTML Lists reference.
As the lesson notes, index.html is the default program that a server will serve when you visit a domain (i.e., put in a web address that simply lists the domain). However, be aware that the webmaster can configure the server to override this default setting, to have the server serve a up a different page for a folder.
Note also that this default feature is not just for the domain root, it's for any directory you use. Thus, the URL
http://pencilcoder.net/lessons
gets interpreted by the server as
http://pencilcoder.net/lessons/index.html
However, there is no such file on the pencilcoder.net server! This is why attempts to navigate to http://pencilcoder.net/lessons will give you a directory of files.
Additional activities
Encourage students to explore different features of both HTML and CSS. There are myriad possibilities! In addition to just "playing around" with different features, consider encouraging students to construct an authentic web site with some content of their own choosing.
Beyond the lesson
Markup Languages
The structure an organization of markup languages provide many potential benefits. Many of these benefits arise from the fact that HTML allows writers to separate content from presentation. In the first place, this means that authors can focus on writing the information without worrying about layout, style, or format. This separation of content from presentation provides other efficiencies too. Using HTML provides flexibility, as you can apply different templates or stylesheets to change the appearance of a document without changing the content. Through code reuse, HTML facilitates making documents more consistent and easier to update and maintain, particularly when working on a project with multiple documents. You only need to change the source file (which establishes the rules) and not the output files. Becuase you can use stylesheets across multiple documents, you can quickly update formatting of all documents in a website by managing a single css file. Thus, in sum, the ability to separate content from presentation facilitates making documents more consistent,maintainable, and adaptable.
Another benefit to HTML is that it makes documents more accessible for people with disabilities. This is accomplished by the addition of metadata, attributes, and references that help users and machines understand the structure and meaning of your document. This includes titles, descriptions, keywords, and alt texts to improve seach engine optimization and support web browser usability and accessibility features.
Other benefits to using HTML owe relate to how the language interacts with CSS and JavaScript. CSS capitalizes on the tree-like structure of the document to apply consistent and potentially complex formatting rules for different page elements. These rules can depend on a combination of the type of element, its attributes, and where they appear in this structure. JavaScript also makes use of HTML's structure and markups to enable programmers to navigate and manipulate the document. Central to this interaction is the HTML document object model (DOM), an object-oriented model of every page that is generated by the web browser. Students will learn more about the DOM in the next lesson.
Lastly, markup languages make documents more adaptable by generating different formats and outputs from the same source file. For instance, you can create HTML, PDF, EPUB, or DOCX files from the same markup file depending on your audience and purpose.
HTML is one of many markup languages, some of which students will encounter in this course. Examples of other broadly-used markup languages include:
- JavaScript Object Notation (JSON): A broadly use format for data storage and transfer which is easy for both humans and machines to read and write. Student will encounter JSON in the The O in I/O! lesson.
- Scalable Vector Graphics (SVG): This filetype allows images to be resized without losing quality. Student have certainly encountered SVG in their use of the web.
- LaTeX: A language for typesetting documents with complex mathematical equations and scientific notation first introduced over 40 years ago, yet still widely in use!
- XML: A language designed for describing data, not displaying it. It is often used for configuration files for computer programs.
- MathML: An XML-based language used to show math equations and formulas on the web. MathML markups embedded in HTML documents by placing them in a math tag.
Web-safe and generic fonts
The CSS font-family property designates the fonts the browser should use when rendering the page. There are myriad choices for fonts. Web-safe fonts are fonts that are widely supported across browsers and operating systems, and which come pre-installed in the browser. Using these fonts ensures that the fonts the web developer chooses will be available on the client's device. This helps ensure that the website will appear consistently across users, regardless of which device they use. A listing of web-safe fonts is available on this w3schools page.
Note that the font-family property allows you to specify a list of fonts. CSS will apply the first font family in the list that it recognizes. The best-practices approach to using font-family is to specify a generic font name at the end of the list. As the term suggests, generic font names indicate a general type of font, rather than a specific font name. They include serif, sans-serif, monospace, cursive, and fantasy. The following example CSS declaration specifies the web-safe font "Trebuchet MS" as the first choice, with sans-serif as a fallback:
font-family: "Trebuchet MS", sans-serif;
There is a plethora of additional fonts available to programmers on the web. Though many must be purchased and downloaded prior to use, many others (such as those found on Google Fonts) can be accessed directly from the web and used for free. Use of Google Fonts was explored in the GoogleFonts activity in the Notes to the Calling All $(".turtle")s! lesson.
External file references
Thus far in these notes, the external files accessed via tags such as <link> and <img> have all been made with a direct reference to the file name, such as in the following example:
<img src="frog.jpg" width="100%">
By simply listing the file name, we direct the browser to search for the file in the same location as the HTML file on the host server. However, it is common to make use of external resources that come from other locations, either in other folders on the host server, or elsewhere on the web. This is done by specifying a pathname, or path, for the file.
There are two types of pathnames. An absolute path is a fully-specified web URL. Absolute paths can be used to identify a file anywhere on the web, either on the host server or elsewhere. For example, absolute paths can be used to read in third-party stylesheets as well as fonts.
A relative path, in contrast, can only read a file from the host server. Relative paths use a mix of standard command-line file directory symbols to point to different locations on the current server, relative to the location of the HTML document itself: a single period indicates the current directory, a double period indicates the parent directory, and the forward slash indicates a subdirectory. The following table shows some examples:
| reference | result |
|---|---|
"FileName.jpg" |
file in current directory |
"./FileName.jpg" |
file in current directory |
"../FileName.jpg" |
file in parent directory |
"../OtherFolder/FileName.jpg" |
file in a neighboring directory |
"/FileName.jpg" |
file in the top-level directory of this account |
CSS box model and the display property
Browsers rely on CSS to determine how to structure and format the elements of each HTML document. For rendering purposes, CSS models every visible page element as a box, following a system of formatting rules known as the CSS box model. Understanding how CSS structures and sizes boxes, and how it combines boxes to form the visible web page, is key to creating more complex layouts with CSS.
Technical note: The CSS box model is a critically important component of web pages. These notes provides an abridged, high-level introduction to this expansive and nuanced topic. Refer to the mdn web docs reference page for The box model for more details.
CSS defines several different box types. This section will discuss the two most fundamental of these: block and inline. These box types corresponding the CSS declarations display:block and display:inline.
The concept of a block box is simple to understand. Block boxes are rendered as simple rectangles. By default, a block box is always placed on a new line and given the maximum width permitted by the element that contains it.
As an example, consider the following snippet of HTML, made up of three div elements. div elements have a display property value of block by default, so CSS will render the elements using block boxes.
<div class="palegreen">This is the palegreen div.</div>
<div class="lavender">This is the lavender div.</div>
<div class="cyan">This is the cyan div.</div>
Each element is assigned a different background-color value (via a class attribute) to reveal its individual CSS box. As expected, each div appears on its own line, and fills the full width available.
An inline box is a bit more complicated to describe. For starters, an inline box may or may not force a line break. When it follows a block box, the box for the an inline element will begin on a new line. Otherwise, the box for an inline element will start to the right of whatever preceded it, which could be the box for another inline element or a box containing text content.
The width of inline boxes is determined by the space needed to render its content. If the required width is greater than the space available on a line, an inline box will continue on the next line (or lines).
The following example illustrates the box behavior of inline box, using several span elements. Once again, each element is assigned different background-color to reveal its individual CSS box.
<span class="palegreen">This is the palegreen span.</span>
<span class="lavender">This is the lavender span.</span>
<span class="cyan">This is the cyan div.</span>
<span class="lemonchiffon">This is the lemonchiffon div.</span>
The non-semantic span element has CSS property display:inline by default. As a result, each span begins where the previous one left off, and fills only the space required by its contents:
Technical note: In the CSS box model, an inline box will always be modeled as a rectangle. However, the shape of the element rendered onscreen will not always seem rectangular, as illustrated by the "lemonchiffon" span element in the foregoing example. The box model rectangle for that element overlaps all the other span elements shown. The CSS box model positions the text for the "lemonchiffon" span inside that box model rectangle in such a way so that, when it overlaps that rectangle with the box model rectangles for the other elements, the text lines up as it does.
Note that block and inline boxes differ in several other significant ways that should be taken into consideration when coding a web page. This simple web page attempts to illustrate some of these nuanced but important features:
- For block boxes, using CSS the
widthandheightsettings, you can override the values computed by default to generate elements of different dimensions. However,for inline boxes, CSSwidthandheightsettings have no affect. - For block boxes,
padding,marginandbordersettings will cause other block elements to be pushed away from the box. For inline boxes, left and right padding, margins, and borders will apply and will cause other inline boxes to move away from the box. Top and bottom padding, margins, and borders will also apply, but will not cause other boxes (inline or block) to move away from the box.
Technicalities
DOCTYPE declaration
The first line of every HTML document should be a DOCTYPE declaration. Though it looks like an HTML tag, it isn't. The declaration comes before the <html> tag and therefore is not part of the document that is rendered on the page. Rather, the DOCTYPE declaration is an instruction to the web browser about what version of HTML the page is written in. In the past, DOCTYPE declarations could be verbose and complicated, referincing specific versions of markup languange standards; however, since the advent of HTML5 in 2015, it has been simplified to <!DOCTYPE html>.
The good news is that if you omit the DOCTYPE instruction, the browser will still infer that your document is HTML. However, it will open the document in non-standard or quirks mode. This means that the browser will render the webpage using outdated rendering rules, essentially mimicking the behavior of older web browsers. In theory this could impact the appearance of your rendered document.
Inline CSS
The lesson describes two ways to specify CSS rules in an HTML document: referencing externally-stored CSS rules using a <link> element, and referencing CSS rules stored internally in the HTML file's head in a <style> element. Referencing externally-stored CSS is considered best practice, at least for larger projects that contain multiple related HTML documents, as it facilitates code reuse. For smaller projects, such as stand-along HTML pages, the use of <style> element is a very convenient alternative.
A third approach, though considered inferior to those described in this lesson, is to use inline CSS. This option permits embedding CSS declarations directly in the HTML code, withing the document body. It's as easy as setting an element's style attribute to a CSS declaration block. When using this approach, enclose the declaration block in quotes rather than curly braces:
<p style="font-weight:bold;">This text is bold</p>
In fact, Pencil Code implicitly does this for us when we select the HTML and CSS pane options in the Pencil Code editor.
Advanced CSS
CSS is a powerful language that has expanded significantly over time. It contains an abundance of properties to control many aspects of how a page will render. Additionally, CSS features includes a number of advanced features. Several of these provide additional rules for defining CSS selectors. For example, CSS Combinators can be used to select only those span elements that are directly nested in p elements, with the selector p > span. Other advanced selectors techniques involve CSS pseudo-classes and at-rules. CSS also includes a wide range of functions. These can be use to calculate values, manipulate strings or colors, create complex gradients and shapes, and more.
All these many advanced CSS features are beyond the scope of this course. For more information, consult a reliable source, such as w3schools or, for the truly ambitious, mdn web docs.
HTML script elements
Client-side executable code (i.e., JavaScript) can be added to HTML documents in several ways. Historically, it was common to see JavaScript included directly in HTML tags, as the values of element attributes such as onclick. However, this approach, dubbed inline Javascript, has for decades been considered poor form and should be avoided.
The preferred approach to adding code to a web page is to use a script element. The script element is a container element. Thus, one approach to add JavaScript to your website is to type your code directly in the <script> element. For example, the following script element, placed in the body of the HTML document, will set the background color of the page to a random color:
<script>
    // Generate random RGB values
    const r = Math.floor(Math.random() * 256);
    const g = Math.floor(Math.random() * 256);
    const b = Math.floor(Math.random() * 256);

    // Construct the RGB color string
    const randomColor = `rgb(${r}, ${g}, ${b})`;

    // Set the background color of the body
    document.body.style.backgroundColor = randomColor;
<script>
Alternatvely, JavaScript code can be stored in an external file referenced using a src attribute. For example,
<script src="./myscripts.js"></script>
There are two important caveats to be aware of here. First, note that the script must contain JavaScript, not CoffeeScript. Code written in CoffeeScript would first need to be compiled, and then the compiled JavaScript would be added using a script element.
Second, unlike most other elements, script can appear either in the document head or in the document body. Note, however, that the placement of the script element can affect how the page is loaded and rendered on screen. For example, the background-color script shown above would not achieve the desired result if the tag were placed in the document <head>. The script would appear to fail, because it would run too soon, before the page has actually loaded. To fix this, we would need to doctor up the code as follows, adding a listener to the onload event, as illustrated here:
<script>
    window.onload = function() {
      const r = Math.floor(Math.random() * 256);
      const g = Math.floor(Math.random() * 256);
      const b = Math.floor(Math.random() * 256);

      // Construct the RGB color string
      const randomColor = `rgb(${r}, ${g}, ${b})`;

      // Set the background color of the body
      document.body.style.backgroundColor = randomColor;
    };
<script>
There are several other critical consideration regarding choice of placement of a script element. See this stackoverflow discussion for details. Additional information about all three approaches to load JavaScript with your HTML document is provided in this GeeksForGeeks article.
Use of external scripts greatly benefits code reuse. This curriculum will explore use of third-party external scripts in the Using your <head>! lesson and creating and using our own external scripts in the ScriptRecycling! lesson.
HTML Entities
HTML character entities are character sequences that web browsers interpret as symbols or characters to render on the screen. They are used to display characters that are reserved in HTML, such as the "left angle bracket" ( < ) character, which can only be used to encode HTML tags. HTML entity names are also used to encode other nonstandard characters and symbols. Students may recall encountering a few such entities in the Math, Mod and More! lesson to represent mathematical symbols such as the division and multiplication operators, ÷ and ×.
Each entity name begins with an ampersand (&) and ends with a semicolon. All entities an be represented by the Unicode code point value (up to four digits, though leading zeros optional). A subset of entities have an easier-to-remember text code as well. See this w3schools reference page for a listing of HTML Entities.
Technical note: Unicode is a computing industry standard for the consistent encoding, representation, and handling of text expressed in most of the world's writing systems. Unicode has over 137,000 characters.
As an example, consider the ampersand, &. You must use an HTML entity to encode and ampersand, because & is the HTML reserved character used to encode all other entity names! As illustrated here, the ampersand symbol can be encoded with & or & or &.
Finally, note that creates a non-breaking space. A non-breaking space is a space that will not break into a new line. That means that words separated by a non-breaking space will stick together, and appear on the next line as a pair. This works because non-breaking spaces don't count as whitespace. This characteristic of non-breaking spaces means that they can be used in succession to force increased space between characters or words on a page.
Inspecting the Pencil Code website
There is a lot that goes into making a Pencil Code program work. When a program is opened and the "start button" is pressed, the Pencil Code server performs many actions in the background to dynamically generate the resulting web page: it reads in multiple third-party scripts, it loads resources likes external fonts and stylesheets, it compiles CoffeeScript code and executes it, and then somehow cobbles all the parts together in a polished finished product. Given the dynamic generation of the web page, we can't see the HTML code that was used to generate the page before it appears. However, we can explore the resulting web page once it has loaded. And this can offer additional insights into how it all works.
Many modern web browser provide resources to facilitate exploring existing web pages. For example, the Chrome browser includes Developer Tools and Apple's Safari includes Web Inspector. The following HTML document was obtained from inspecting this simple Pencil Code Script.
Technical note: The Pencil Code development environment (i.e., what appears when the URL for the page includes /edit/) generates pages with rather complicated structures. For example, it makes use of frame elements to view more than one HTML document at the same time and it layers in multiple other page elements to generate a test console and coding palette. For this reason, the example explored here is of the page Pencil Code generated when the program was run in output mode (i.e., when the path includes /home/).
The actual HTML obtained from the developer tools has been slightly abridged to save space, and annoted to highlight some key features; otherwise, it is the same basic framework you would get when running any Pencil Code program. The information in these annotations was all gleaned by using Chrome's developer tools.
<!DOCTYPE html>
<html>
<head> </head>
<body>
<!--CONTAINER FOR SPRITES, LABELS, AND BACKGROUND CANVAS-->
<samp class="turtlefield" style="position: absolute; display: inline-block; top: 0px; left: 0px; width: 1000px; height: 800px; font: inherit; z-index: -1; transform-origin: 500px 400px; pointer-events: none; overflow: hidden;">
<!--BACKGROUND CANVAS-->
<canvas width="1000" height="1000" style="z-index: -1; width: 1000px; height: 1000px;"></canvas>
<!--CONTAINER TO ANCHOR SUBSEQUENT ELEMENTS TO CENTER OF SCREEN-->
<samp id="origin" style="position: absolute; display: inline-block; top: 400px; left: 400px; width: 100%; height: 0px; font: inherit; transform-origin: 0px 0px; pointer-events: all;">
<!--CANVAS FOR THE DEFAULT TURTLE.-->
<canvas width="40" height="48" style="[actual code is verbose and therefore omitted]" class="turtle" id="turtle"></canvas>
<!--ELEMENTS FOR SPRITES (canvas) AND TEXT CREATED WITH label FUNCTION (label) APPEAR HERE-->
</samp>
</samp>
<!--ELEMENTS ADDED IN THE PENCIL CODE HTML EDITOR APPEAR HERE-->
<!--SCRIPTS TO RUN PENCIL CODE-->
<script src="//pencilcode.net/turtlebits.js" crossorigin="anonymous" type="text/javascript">
</script>
<script type="text/coffeescript">
eval(this._start_ide_cs_);
#your coffeescript code would appear here
</script>
<!--ELEMENTS ADDED WITH write, typeline ETC ADDED HERE-->
<div style="display:table;">Example of element added with write</div>
<div style="display:table;">
<h1>Example of header element added with write</h1>
</div>
<pre>Example of element added with typeline</pre>
</body>
</html>
There are a number of interesting features to explore here, but mostly that will be left to the reader. Perhaps the most insightful for the author of this document is that it provided an understanding of behavior that I could not make heads or tails of: no matter what z-index is assigned to text elements created with Sprite or write, I could never get the turtle to appear on top. The key to figuring out this puzzle is in the samp elements, which the document uses as generic containers to break up and organize the page. The "a-ha" observation is that the z-Index value of the outermost samp, which contains sprites, is -1. The result is that all elements within this container are always behind other page elements. Even if you assign a z-Index of the sprite to 999, it will still be behind every such page element.