Teacher's Guide: DOManipulation!
Overview
This is the second of two lessons that delve into the fundamentals of web page development. These lessons differ from all other lessons in the curriculum in that they instruct students to construct web pages from scratch, i.e., without relying on the scaffolding provided by the Pencil Code coding environment. The previous lesson focused on constructing simple, fixed-content pages using pure HTML and CSS. This lesson shows students how to add JavaScript scripts, thereby giving them tools to make their stand-alone web pages interactive.
Aside from teaching students to build web pages using HTML, CSS, and JavaScript, these lessons aim to provide students a clear understanding of the structures linking JavaScript, HTML, and CSS in a browser: the Document Object Model (DOM) and the DOM Application Programming Interface (DOM API). This foundation is essential to students' longer-term proficiency in web programming. In the near term, knowledge of HTML page structure and the DOM will allow them to more effectively harness system events, the focus of the next lesson.
More about the lesson
The DOM and the JavaScript DOM API
The Document Object Model (DOM) is an object-based representation of the currently-loaded web page generated and maintained by the web browser. Using JavaScript, developers can interact with the DOM, allowing them to update page content, structure, and style and to respond to events.
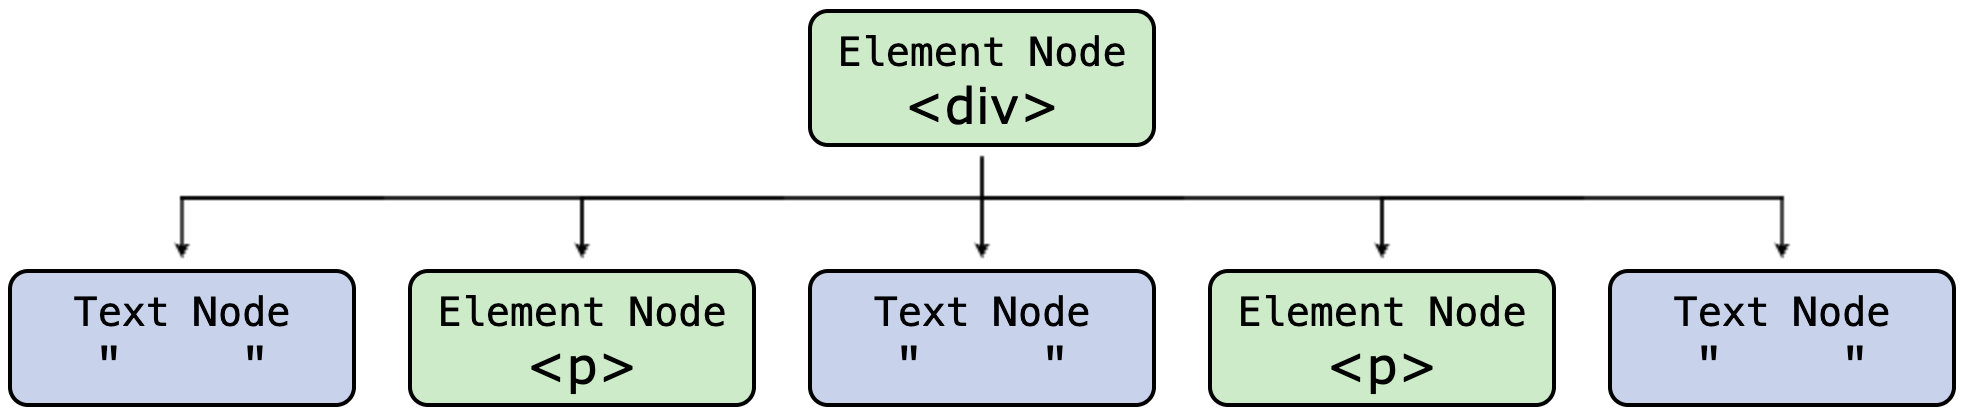
Mirroring the structure of HTML documents, the DOM represents the currently-rendered HTML page using a tree-like structure of objects called nodes. For example, the following diagram illustrates the HTML code for a simple, fixed-content web page and its corresponding DOM:
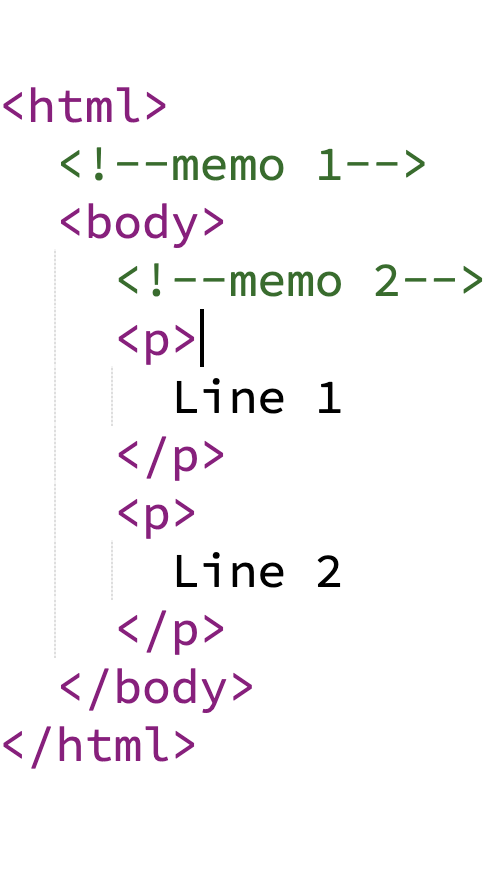

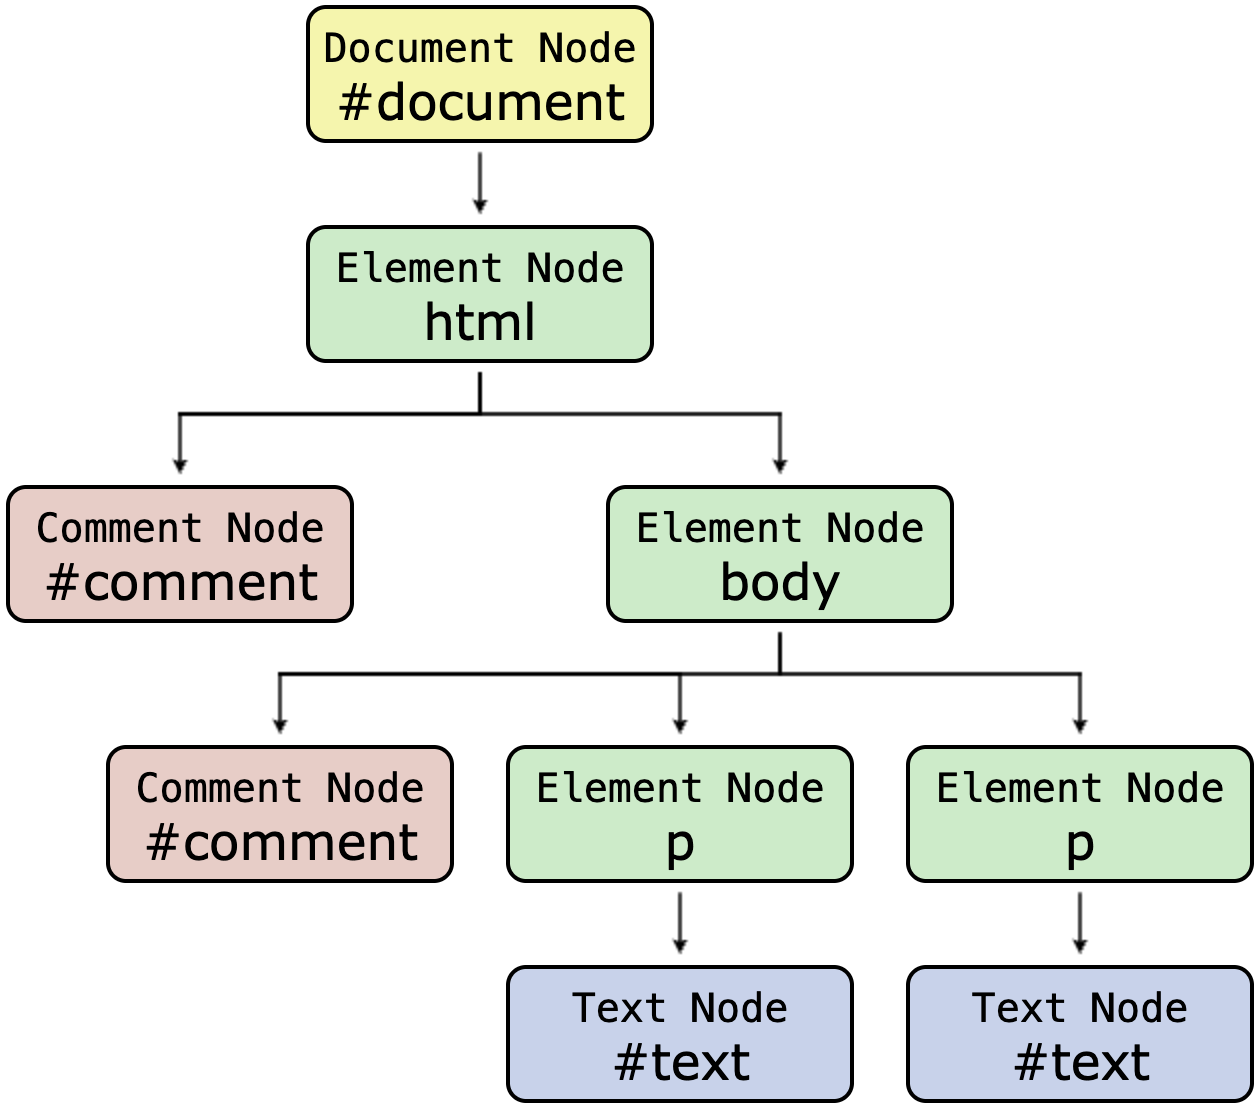
As the diagram indicates, different node types are used to model different types of page elements. These include element nodes (representing HTML page elements, such as <html>, <body>, <div> or <p>), text nodes (representing the text content within elements), and comment nodes (representing HTML comments).
Technical note: for ease of exposition, the foregoing example of DOM structure ignores a technicality involving whitespace between tags in HTML source code, which causes the browser to included additional Text nodes in the DOM. Details are provided below.
At the root of the DOM structure is the one and only document node. It is commonly referred to as the root node. The document node acts as the central point of access for managing the entire web page.
Technical note: The root of an HTML document is the <HTML> element, often referred to as the document root. Don't confuse this with the DOM's root node—which, because it contains the entire HTML document, is also known as the document node.
Core JavaScript does not include any tools to access the DOM. Rather, this functionality is provided via an application programming interface, the DOM API. This set of code is written by each browser vendor to facilitate interaction between JavaScript and the DOM, according to an industry-standard called the DOM API specification. This API is automatically included in JavaScript applications running in the browser context.
The DOM API provides JavaScript programmers access to the current page's DOM via the global JavaScript object document. document references to the DOM's root node (i.e., the document node).
All JavaScript Node objects possess a wide variety of properties and methods which can be used to modify the referenced DOM entity. They also possess properties which facilitate navigating the DOM tree. The document object is unique in that it has several methods specifically designed for working with the whole DOM tree. For this reason, it is the starting point for any JavaScript program that will interact with the web page in any fashion.
The lesson illustrates the use of document methods querySelector and createElement. querySelector establishes a reference to the node of an existing page element. The example call to the querySelector method makes use of a string argument that identifies a page element using CSS id-selector syntax ("#div1"). The call to document's createElement method creates, and returns a reference to, a new page element node. Note, however, that the call to createElement does not place the node in the DOM tree, and hence does not result in a corresponding html element added to the currently-rendered page; that must be done separately, using a node method such as appendChild.
JavaScript Element objects, such as those returned by document's querySelector and createElement methods, posess additional properties and methods that allow programmers to manipulate the element and its attributes. The lesson provides some simple examples, such as the Element object style property, which corresponds to the underlying HTML element's CSS style attribute, and the innerText property, which provides access an element node's text.
Nuances in Node object properties and methods
The lesson makes a point of noting that there are often different ways to accomplish any given task when using the tools of the DOM API. The point isn't simply that there are multiple possible solutions to any given problem—that's true of just about any coding task—but rather that there are many redundancies built into the DOM API which can be quite confusing, especially to novices.
There are various reasons for these redundancies. In some cases, such as the example given in the lesson, it is simply a feature of JavaScript objects which include getter or setter functions access and update object properties. The lesson's coding snippet illustrates that one can update an attribute of an element object using assignment directly to the object property (p1.style.color="red";) or using a method designed to accomplish the same task (p1.style.setProperty("color","red");).
Many redundancies owe to the evolution of the JavaScript DOM API over time. Some changes are made to accommodate new language features; others are added to make it easier to accomplish certain tasks. Earlier language features are sometimes deprecated, but oftentimes they are just maintained as alternatives.
The Element object's style setProperty and getPropertyValue methods are more recent additions to the interface, added to address limitations of earlier methods. The details get a bit technical (involving a discussion of the CSS Object Model), but in short these methods were added to provide a more structured and powerful way for JavaScript to interact with and manage CSS on web pages, particularly with the evolution of CSS and the increasing need for dynamic styling.
Prior to the introduction of setProperty and getPropertyValue, it was common to update Element attributes using the Element object methods getAttribute and setAttribute. These are straightforward tools to use with many Element attributes, such as id or src. However, they are cumbersome to use to access or update the CSS declarations registered in the Element node's style attribute, as the following example illustrates:
let p1Style=p1.getAttribute("style");
p1Style = p1Style + "font-size:50px";
p1.setAttribute("style", p1Style);
Coding in pure Javascript / CoffeeScript transpilers
Code executed in the browser has to be JavaScript, not CoffeeScript. Students will need to learn a few features of JavaScript to work through this lesson.
As noted in the lesson's snippets, variables should be declared before they are used in JavaScript. The reason for this is that if you don't declare a variable, then it will automatically be given global scope. In very simple scripts (such as the coding snippet) it wouldn't make any difference. In more complicated programs, being careless with scope can lead to devilish bugs. It's a good practice to enforce variable declaration in JavaScript programs by including the statement 'use strict'; at the beginning of the script.
var, let, and const are all used to declare variables. These keywords differ in scope and mutability of the variable. var is function-scoped, meaning the variable exists only within the function. let and const are block-scoped, meaning that their scope is limited to the sets of curly braces that contain them, such as within a for loop or an if block. var allows re-declaration and reassignment within its scope, let allows reassignment but not re-declaration, and consts allows neither reassignment nor re-declaration after initialization.
To write non-trivial scripts, student will need to be able to iterate over collections in JavaScript and write functions. Each of these tasks can be accomplished in a variety of ways. Below are examples that illustrate one approach to coding each task in JavaScript:
- for ... of loop for iterating over collections:
const myArray = ["alpha", "beta", "gamma"]; for (const item of myArray) { // for loop body goes here }- arrow function expression (a.k.a. fat arrow notation) for defining functions
const greet = () => {
  // function body goes here
};
Encourage students to code basic JavaScript of their own, following the example provided in the lesson's coding snippet. However, as they attempt to delve beyond the basics, encourage the use of an online coffeescript transpiler such as this one by AWSM or this one by CodeConvert. For example, even something as writing a simple for loop looks a lot different in JavaScript. Remind them, however, not to embed any jQuery function calls or to use any of the Pencil Code methods in their coffeescript programs. We have not imported the relevant JavaScript libraries, so these tools will not work.
<script> tag placement
JavaScript code can either appear directly within <script> tags, or indirectly in an external file referenced through a script tag using the src attribute, e.g.,
<script src="./myScript.js"></script>
<script> tags can be placed in the document's <head> or <body>. The choice of placement can significanly affect how the browser renders the page and can impact whether JavaScript code will work as intended or not.
As a general rule, scripts placed in the document <head> will be downloaded and executed before the browser renders the page's content. This can be useful for scripts that need to run immediately, such as setting up the page environment or loading critical features. However, unless special steps are taken (one of which is discussed in the Beyond the Lesson section, below), code placed in the <head> can be executed too soon, before the browser parses the DOM.
Scripts can be place anywhere within the <body> section. Typically, the best location is just before the closing </body> tag. This allows the HTML content to be parsed and displayed to the user first, improving perceived page load speed. It also ensures that HTML elements are fully loaded before the script attempts to interact with them, reducing the risk of errors. Thus, for the purposes of this lesson, the simplest approach is to insert <script> tags as the last tag in the <body> tag.
Notes to activities
This lesson represents a break to the coding students have done thus far in the curriculum, as they won't be able to use CoffeeScript, jQuery, or any of the convient features added in the Pencil Code development environment. Coding in JavaScript will certainly present some challenges to students and add some extra frustrations. Key to keeping things manageable is to keep the tasks simple. Even more importantly, coach students to modify their scripts to only one or two lines at a time, and then test the script to verify they accomplish the desired results. Error feedback for JavaScript coding is very limited in the Pencil Code environment when working directly on .html files, so it is best to catch and debug errors as quickly as possible.
Students' ability to affect changes onscreen using the methods introduced in this lesson will be severly limited compared to what they have been doing throughout this course. The complexity of working with more rudimentary tools can seem overwhelming, so be careful to coach students not to be discouraged. Rather, this experience should give them greater appreciation for the value of relying on libraries, such as all the features added by jQuery and Pencil Code's jQuery-turtle.js library.
Remember that the goal of this lesson is not to make students experts at using pure JavaScript. Rather, the goal is to help them gain a better conceptual understanding of the DOM. After this lesson, students will return to using regular Pencil Code programs and all the tools with which they have gained expertise over the course of the curriculum. But they will be positioned to better understand more advanced concepts and tools, such as working with DOM in more sophisticated ways in reacting to mouse events, the focus of the next lesson.
Additional activities
- LogErrors: use try/catch to catch Javascript errors, and log the results on the page to a pre element, to assist in debugging.
- Events: Write a simple script that creates a listener for system events, such as keyboard input or mouse clicks.
- HideAndShow: there are three ways to change an element's visibility. Write a script to experiment with the
hiddenattribute, and thedisplayandvisibilityproperties of thestyleattribute.
Beyond the lesson
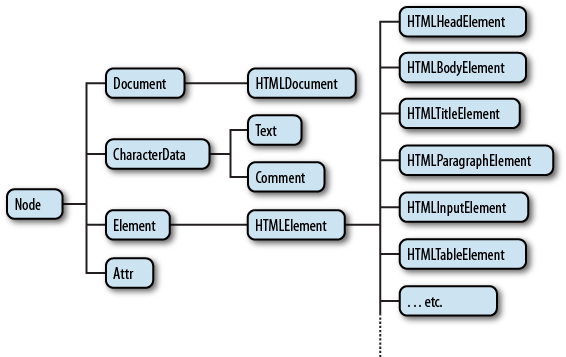
Node types and their properties
The JavaScript DOM API defines classes that correspond to different types of DOM nodes. Node is an abstact base class upon which other DOM API objects are based.
The Node class defines a number of properties and methods inherited by all other node types. These include many read-only properties that facilitate navigating the DOM, including:
firstChild |
returns the Element's first child node |
lastChild |
returns the Element's last child node |
previousSibling |
returns the Element's previous sibling node |
nextSibling |
returns the Element's parent node |
parentNode |
the overall keyboard pixel height |
Node navigation properties are explored in the context of a "standard" Pencil Code program in this script.
Node class methods that are likewise inherited by all other node types; these include:
nodeType() |
returns a number representing the type of the node (1 for an Element node, 2 for an Attribute node, 3 for a Text node, and 8 for a Comment node) |
appendChild(aNode) |
adds the specified node as the last child of an element |
cloneNode(deep) |
creates a copy of the element (the boolean parameter controls if the subtree contained in a node is also cloned or not) |
hasChildNodes() |
returns true if the element has any child nodes |
removeChild(aChild) |
removes the specified child node from the element |
DOM Navigation nuances
Be aware DOM navigation and manipulation is complicated by several factors. One challenge relates to the fact that when creating the DOM, the browser parses whitespace (e.g., line feeds and spaces) between tags in an HTML document as a Text nodes. For example, consider the following block of HTML. As this script demonstrates, the div contains not two, but five children: three Text nodes and two Element nodes.
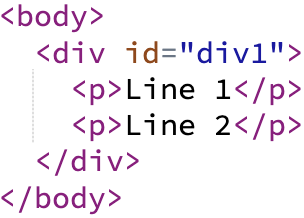
Technical note: By removing the whitespace between HTML tags in the source code, one can eliminate such Text nodes, but it comes at the cost readability:
<body><div id="div1"><p>Line 1</p><p>Line 2</p></div></body>
Though text nodes appear between Element nodes, they don't affect how the web page appears on screen, owing to the fact that the browser ignores whitespace between elements when rendering the page. In practice, these nodes do tend to be something of a nuisance when navigating the DOM, though they are easy enough to work around. It is common to test nodes using methods such as nodeType to ensure that the node is in fact the type of node you are looking for.
A separate issue arises owing to the fact that much DOM manipulation involves iterating over collections of nodes, is that the collections can behave differently depending on how they were generated. The querySelector method returns a static NodeList, a collection of all elements in the document that match the specified group of CSS selectors at the time the method was called. However, one can generate similar collections using other means, such as by referencing the Node property childNodes. The complication is that these tools return a live HTMLCollection. This object is an array-like collection that provides a reference to the DOM which automatically updates to reflect changes in the DOM. The live nature of such collections is a useful feature, but it can also complicate efforts to change the DOM. For example, changes to the DOM while iterating over it can potentially lead to unexpected or unintended behavior, like skipping elements or infinite loops.
Element and HTMLElement nodes
As indicated in the diagram above, the abstract Element and HTMLElement node types form the basis of all specific HTMLElement types, such as HTMLDivElement and HTMLParagraphElement. These abstract node types define additional properties and methods which are common to all kinds of elements. A handful of these are listed below. However, there are many, many others. For a complete list and more details, refer to the MDN documentation, both for the general Element node type, as well as for additional properties and methods for specific element types.
gElement.getAttribute() |
retrieves the value of the named attribute from the current node and returns it as a string |
Element.getAttributeNames() |
returns an array of attribute names from the current element |
Element.hasAttribute() |
returns a boolean value indicating if the element has the specified attribute or not |
Element.removeAttribute() |
removes the named attribute from the current node |
Element.after() |
inserts a set of Node objects or strings in the children list of the Element's parent, just after the Element |
Element.append() |
inserts a set of Node objects or strings after the last child of the element |
Element.querySelector() |
returns the first element that is a descendant of the element on which it is invoked that matches the specified group of selectors |
Element.querySelectorAll() |
returns a static NodeList representing a list of elements matching the specified group of selectors which are descendants of the element on which the method was called |
The HTMLElement class adds, among other things, style and innerText properties, both of which are referenced in the lesson and discussed above.
HTMLElement.innerText |
represents the rendered text content of a node and its descendants. As a setter, it replaces the content inside the selected element, converting any line breaks into elements. As a getter, it approximates the text the user would get if they highlighted the contents of the element with the cursor and then copied it to the clipboard. |
HTMLElement.style |
provides access to the element's style attribute. |
Additional document methods
The document object was introduced in some detail above. The table below lists some additional, frequently-used methods:
getElementById(id) |
returns an element from the document based on its unique id attribute. |
getElementsByTagName(name) |
returns a live HTMLCollection of all elements in the document with the specified tag name |
getElementsByClassName(className) |
returns a live HTMLCollection of all elements in the document with the specified class name |
querySelectorAll(selectors) |
returns a static NodeList containing all elements that match the specified CSS selector(s) |
createTextNode(text) |
creates a new Text node |
There are performance differences and varying convenience factors to consider between differ tools to identify page elements. Use querySelectorAll when you need to select elements based on complex CSS selectors and don't require the collection to update with DOM changes. Use getElementsByClassName when you only need to select elements by class name and prefer a live collection that automatically reflects DOM changes. Note that both HTMLCollection and NodeList are array-like objects that lack many standard array methods. That means that it should be converted to an actual array, using the built-in Array.from method, before attempting to manipulate it or iterate over it as an array.
DOM Manipulations using jQuery
jQuery offers a comprehensive set of methods for manipulating the DOM, simplifying common tasks that would be more complex in plain JavaScript. To use jQuery in a stand-alone website, the first step would be to load the library. Loading and working with external libraries is the focus of This can be done with a <script> tag in the documeent header. Various repositories make jQuery available online. One possibility is:
<script src="https://ajax.googleapis.com/ajax/libs/jquery/3.7.1/jquery.min.js"></script>
This curriculum has previously formally introduced students to the css and addClass methods (see Label Recycling!). The val method, used to get or set the value of form elements, was introduced in an activity in the Notes to the Event Objects lesson. Refer to jQuery documentation for a complete listing of available methods. Below is a sample of jQuery methods and their corresponding DOM API methods:
| jQuery | DOM API Equivalent |
|---|---|
$(selector).text(content) |
element.textContent = content |
$(selector).append(content) |
element.appendChild(node) |
$(selector).attr(attributeName, value) |
element.setAttribute(attributeName, value) |
$(selector).find(selector) |
element.querySelector(selector) |
$(selector).parent() |
element.parentNode |
$(selector).clone() |
element.cloneNode(true) |
This script provides an example of importing jQuery and using jQuery DOM methods.
Additional resources
MDN Web docs provides detailed and thorough explanations of key concepts discussed in this lesson. Of particular note are their notes on the Document Object Model and the HTML DOM API. The "Interfaces" reference provides detail on individual Node types.
What can go wrong
JavaScript (and CSS) syntax
One of the biggest challenges for students in this lesson is getting JavaScript syntax correct. For those long used to coding in CoffeeScript, it's very easy to forget parentheses and semicolons.
Logging errors
The hardest thing is that the Pencil Code editor won't tell you when your script has a bug. Rather, the script just won't do anything (starting at the point of the bug). For example, if you reference a variable inappropriately, or use a method incorrectly.
If you use developer tools, or some other online HTML coding platform, then you can write to console and or see errors. But in Pencil Code you can't. In the Additional activities, above, one exercise shows how you can use try/catch report errors to an element on the page.
Technicalities
APIs
An API, or application programming interface, is a connection or intermediary that enables different software components or applications to communicate with each other. It defines a set of methods, protocols, and definitions for interacting with a specific software system, service, or library.
As noted above, the JavaScript tools used to access the DOM are not native to JavaScript. Rather, this is provided by the DOM API, one of a set of JavaScript Web APIs that allow JavaScript code running in a web browser to interact with various functionalities of the browser and the operating system, enabling dynamic and interactive web experiences. For example, the Fetch API and the older but still widely-used XMLHttpRequest API give access to browser features that enable fetching resources across the network; the History API provides access to the browser's session history, and the Web Storage API allows web applications to store data locally in the user's browser. MDN provides a complete listing of Web APIs here.
As with the DOM API, other Web APIs are not part of core JavaScript itself, but rather built into browsers and available for use by JavaScript code. Browsers automatically load all Web APIs to JavaScript applications running in the web browser and gives access to them through a various of global objects, such as the document object for the DOM API and the localStorage and sessionStorage objects for the Web Storage API.
Technically speaking, there is not just one set of Web APIs. There is a single specification for the Web APIs, but each browser has it's own implementation of the DOM API. This owes to the fact that different browsers use different engines (Chrome and Edge use Blink, Safari uses WebKit), which necessitates different sets of code. These differences can also at times lead to differences in how JavaScript and DOM interactions are handled. Students are unlikely to encounter any cross-browser differences in their scripts, but the fact remains that it continues to be best practice to test your web applications in all browsers to ensure consistent behavior, especially when working with DOM manipulations.
Web APIs (as well as third-party APIs) are discussed in depth in this MDN Introduction to web APIs page.
<script> tag placement
The timing of execution of code in <script> tags can be affected by several factors, including not only where in the HTML document the tags are placed, but also the use of script attributes such as defer and async. For a thorough discussion of these issues, see the MDH Docs Script Element reference.
When not using these special attributes, code placed in <script> tags is executed before the browser completes parsing HTML and constructing the DOM. Hence, code intended to manipulate the DOM placed in a <script> tag in the document <head> will be executed too soon. However, there is a clever workaround, involving events.
The DOMContentLoaded event fires when the browser has completed building the DOM. Establish an event handler for this event using the following code. Any code placed in the function body will run as soon as the page loads.
document.addEventListener('DOMContentLoaded', function() { ... });Placing <script> tags in the document <head> is useful for adding external resources, such as JavaScript libraries, the focus of a later lesson. These are imported by identifying them with the src attribute rather than the inline JavaScript illustrated in this lesson.
Attribute nodes
In earlier versions of the DOM, Element attributes were stored in a distinct node type, Attribute. This node type lives on, though in the modern DOM specification, Attribute nodes don't function within the same hierarchical structure as other nodes. The DOM considers attributes to be properties of the element nodes they describe, rather than separate nodes within the document hierarchy. As a type of node, Attribute nodes (Attr objects) inherit all the aforementioned Node methods and properties. However, their parentNode, previousSibling, and nextSibling properties are always null.
Some Element attributes have corresponding DOM properties that offer a convenient way to interact with them. However, this is not always the case. All element attribues can be manipulated using the Element node getAttribute and setAttribute methods, discussed above.