Teacher's Guide: Label Recycling
Overview
This lesson introduces students to the jQuery function and the jQuery addClass, css, and html methods. These tools enable students to modify the formatting of text created with the label function and to manipulate text elements on screen as they would any other sprite. Beyond these immediate benefits, this lesson aims to deepen student understanding of the HTML, CSS, and jQuery features that underlie the Pencil Code programming environment.
More about the lesson
The lesson provides instructions for modifying the formatting and text content of <label> elements. In the process, it teaches students to create Pencil Code sprites on their own, without resorting to the built-in constructors, such as Turtle or Sprite. These notes aim to fill in additional details about why the different steps described in the lesson must be taken and to provide a richer understanding of the underlying web programming concepts and at work.
Broad web program topics to be addressed in these notes include the jQuery library, HTML id and class attributes, CSS selectors, and jQuery DOM selectors. Additionally, these notes discuss the Pencil Code HTML class attribute "turtle", in particular explaining how it impacts how calls to await done defer() affect the animation queue.
jQuery
Recall that a JavaScript library is a collection of pre-written JavaScript that allows for easier development of JavaScript-based applications. Libraries are typically downloaded by the brower when the web page first loads. (Students will learn to incorporate third-party libraries into their programs in the Libraries! lesson.)
The jQuery selector function, jQuery, is the core of the jQuery library, a widely-used resource that was created to make it easier and simpler to write complex JavaScript that interacts with HTML and CSS in a consistent manner on any browser (Chrome, Safari, Firefox, etc.).
Behind the scenes, the Pencil Code environment makes extensive use of jQuery. In fact, the function calls for every Pencil Code sprite, inluding all of their animations, depend on jQuery, and the Pencil Code animation model is a tweaked version of the jQuery animation model.
This lesson demonstrates the usefulness of jQuery to gain access to HTML elements created with the label function. But as this and subequent lessons will illustrate, students must learn to make explicit use of jQuery features in order to unlock the many other powerful web programming features of the jQuery library.
Accessing and modifying HTML <label> elements
As illustrated in the lesson's coding snippet, accessing and manipulating an HTML element created using the label function can be accomplished in four steps:
Specify an
idattribute for the<label>element by including anidproperty in the object passed as the second argument to thelabelfunction:label "Original text", { id:"exampleLabel_ID", color:teal, fontSize:50 }Obtain a reference to the newly-created
<label>element by calling thejQueryfunction with a String argument identifying the label'sidvalue:textSprite = jQuery("#exampleLabel_ID")The
jQueryfunction is referred to as the jQuery selector function because it is used to identify specific HTML elements on the page. In this example, the selector function is being passed an HTML id attribute. To convey that an argument represents the id of an HTML element, the argument must be specified in id-selector syntax, which prepends the id value a hashtag (e.g.,"#exampleLabel_ID").Note that
jQuerydoes not return the<label>element itself, but rather a reference to a JavaScript object which points to that element. We record this object reference for subsequent use by assigning it to a variable name (e.g.,textSprite).The JavaScript object created by
jQueryis a specialized object. It is described as an instance of a wrapper class, because it "wraps" additional functionality around the underlying HTML element. The extra functionality includes most of the attributes and familiar functions that make a sprite a sprite, such asfd,pen, anddot, as well as the methods introduced in this lesson,cssandhtml.Add the value
"turtle"to the<label>element's class property, using the jQueryaddClassmethod:textSprite.addClass("turtle")This step is required so that Pencil Code will recognize the new jQuery object as a sprite, which in turn is necessary to ensure that the statement
await done defer()will wait for function calls in the newly-created jQuery object's animation queue. If this step is omitted, the statementawait done defer()will likely not function as expected.Use the
cssandhtmlmethods to change the formatting and content of labels, respectively:await done defer() textSprite.css color:violet, fontFamily:"sans-serif" textSprite.html("Replacement Text")As with calls to
getxyandtouches, calls tocssandhtmldo not get added to the animation queue. Thus, as this example illustrates, these function calls must be preceded by a call toawait done defer()to ensure that they are executed (and their effects become visible) at the intended part of the animation queue.
Notes to activities
The activities in this lesson are largely focused on capitalizing on students' newfound ability to modify sprites' text content and formatting, as well as to manipulate the "homemade sprites" as they would any other sprite. The Additional Activities, listed below, will explore some other possibilities made possible by the jQuery selector function. The ativities are designed to give students continued practice with previously-learned language features and exercise their computational thinking skills as well.
The DisappearingInk activity is intended to be a simple warmup that has students create a "label-sprite", and then manipulate it as they might any other sprite. The use of fadeOut is one of many possible manipulations students can do. Regarding fadeOut, make sure students spell it correctly (using camelCase), and perhaps remind them that it accepts a numeric argument representing the number of milliseconds for the animation.
The IntoFocus activity extends the learning of the previous exercise to manipute the resulting label-sprite's CSS properties using the jQuery css method. Students will need to call await done defer() to control the timing of subsequent calls to css.
The CountDown activity directs students to modify the text content of a label. This can lead to some unexpected formatting issues. In particular, the label is likely to appear to move around the screen as the text value changes. Despite appearances, however, the label is not moving. In fact, the apparent movement owes (somewhat ironically) to the fact that the HTML <label<> element is anchored to a specific location on the screen. In technical terms, the element has the attribute position:"absolute".
There are a wide variety of potential solutions to the "Jiggly Label" issue, and thus a great opportunity to apply some computational thinking, as well as exploring features of web programming. Methods to address this issue are suggested in a series of "JigglyLabel" activities, below. However, for more immediate gratification (and a solution which will be useful in the Scorekeeper activity) a straightforward and intuitive solution is to reposition the sprite on the desired center-based coordinate each time the label's dimensions change, e.g., using jumpto at speed Infinity.
The Scorekeeper activity has a lot of moving parts, given the number of the turtles, labels, and related information (color, progress, etc.). Students will likely benefit by organizing their data using custom objects. For example, add properties to sprites to record attributes such as color and progress, rather than storing these values as separate variables. The benefit is that object variables can be easily referenced in a for x in loop using dot-notation, rather than having to resort to conditional logic (which would lead to much more bulky code).
Additional activities
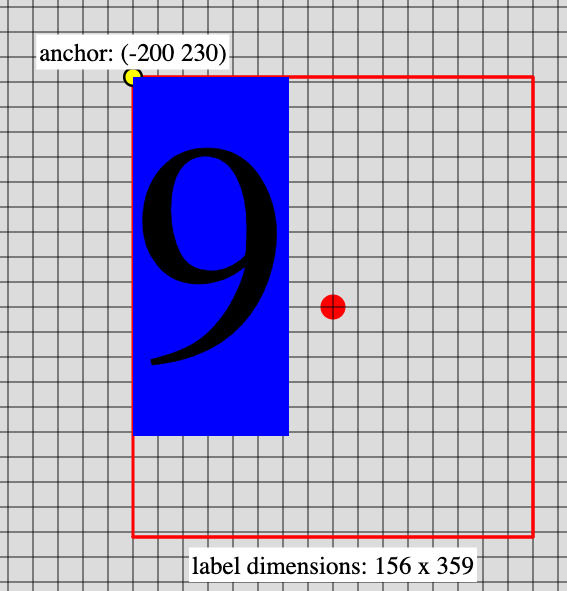
LabelJiggle: The label in students' Countdown programs likely move around a bit each time the HTML content changes (or at least will have done so initially, before student efforts to counteract this effect). This movement owes to a difference between how Pencil Code positions labels and how the browser positions HTML elements on screen.
Pencil Code positions labels based on the center of the underlying HTML element (the same way it positions sprites created with the
Turtle,Piano, andSpriteconstructors). The browser, in contrast, positions HTML elements on screen based on their top-left corner. When a label-sprite is resized—as happens in Countdown when the text value and/or the font sizes change—its width and/or height change. As the dimensions of the element change, the distance from the center of the sprite from it's page anchor in the top-left corner changes, and as a result the sprite appears to move, even though, from the perspective of the browser rendering the HTML, the element's position on the page remains fixed.When working with sprites, we normally don't have to deal with this complexity, because Pencil Code silently translates between the two systems of positioning for us, behind the scenes, and repositions the page element so the location of the sprite onscreen appears fixed to the viewer. Thus, calls to
jumptoorgetxyconsistently yield the expected result—even for label-sprites (because they are sprites too!). However,htmlandcssare jQuery functions, not Pencil Code. Calls to these functions do not invoke the necessary translation between positioning systems and thus problems arise.Here is enhanced teacher version of the LabelJiggle program:
There are a number of remedies to this meandering-label problem. As a first step towards remedying it, write a script called LabelJiggle to isolate and clearly identify the issue. Create a copy of the basic Countdown program, but modify it so that the initial label (the argument to
label) is an empty string. In addition toid, defineborderandbackgroundColorproperties for this string. These setting will make visible the full outlines of the HTML element created by the label function.Because it has no text, the label-sprite will initially have height and width dimensions of zero, so both its center-based (Pencil Code) and top-left-corner-based (HTML) location will be the same. Now, as the Countdown loop commences, the challenge students are up against should be more visible! And this basic coding framework will serve as a useful sandbox for testing potential remedies.
LabelJigglePcFix: A relatively easy remedy to the "label jiggle" problem is to call a Pencil Code coordinates function (such as
jumpto) to reposition the label based on its original center point after each call tohtmlorcss. Doing so causes Pencil Code to recalculate the new top left corner of the underlying HTML for us. Apply this "Pencil Code-based" strategy to prevent the countdown text from wandering about in a program called LabelJigglePcFix.However, this stratey will only work with plain-text labels, without decorations such as borders or background colors or additional properties such as
heightandwidth. These last two are problematic because the text in the label will by default appear in the upper-left-hand corner of the HTML element. While calls tojumptowill reposition the HTML element to the center of the screen, the text will meander within that element. But not to worry: the next exercise provides an alternative solution.When formatting HTML elements on the screen, website programmers occasionally run into side effects to seemingly straightforward changes such as the "label jiggle" caused by changes to the text or formatting of a label. Thankfully, CSS options typically offer many solutions to such problem. Carefully chosen CSS settings can prevent problems from arising in the first place! In a program called LabelJiggleCssFix, begin again with a simply copy of LabelJiggle, but this time set the
widthandheightproperties to constant values. If they are large enough, the overall graphic won't appear to change as the text changes. Now explore thelineHeightandtextAlignproperties, to use them to stop changing labeinside it will continue to move up and to the left. Experiment with this property to generate nice labels that don't meander.MixedFontMsg: Pencil Code parses the string argument passed to
labelas HTML. That means that the browser will process HTML codes embedded in the string when it renders the label on the screen. This makes the inline container tag,<span>, a particularly valuable feature.<span>can be used to set specificstyleattributes for subsets of the string, as illustrated here:label "This is a <span style=color:gold;>gold</span> word!", 50
In this activity, use
<span>to decorate subsets of label. However, rather than hard code thestyleattributes, as illustrated above, simply include a separateidfor each inline container. You can then use jQuery to access each of these elements separately, to subsequently modify the content and/or formatting of each part of the label as many times as you want.Here is another example in which the rainbow colors appear to slide across the screen; though, if you look inside the code, you will see it utilizes a slightly different approach than outlined above.
Hint: research the
displayproperty of the CSSstyleattribute. It will let you remove words from the string!LeapTurtle: Many of the behaviors of sprites are determined by CSS style attributes associated with the underlying HTML element. One such attributes is
z-index, which determines which page element appears "on top". The value is a integer (including negative values and zero). For example, the default turtle usually appears on top of other page elements, including other sprites and<label>elements. But you can put it behind the others, with the following line of code:turtle.css zIndex:-10
In this activity, use the
z-indexattribute to create a leap-frog-like program involving two turtles. Naturally, the one doing the leaping should always be on top.As an additional twist, explore changing the
turtle-easingstyle attribute to'linear'(the default is'swing').
Beyond the lesson
Converting an HTML element into a working sprite
The label function creates an HTML <label> element at the position of the calling sprite. The fact that it is its own element, rather than graphics written directly to the background <canvas> element, makes it similar to Pencil Code sprites, each of which is also its own HTML element. However, Pencil Code executes three additional steps to make an HTML element a fully functioning sprite. These steps are all carried out automatically by the call to the sprite constructor (such as Turtle or Sprite). Each Pencil Code constructor, when invoked with the reserved word new, does the following:
- creates an object—technically, a specialized jQuery-turtle object—that references the HTML element and provides all the sprite functions that we have been using throughout this course to manipulate sprites;.
- returns a reference to the newly-created object which we assign to a variable name that we subsequently use (with dot-notation) to control the sprite; and
- assigns a value of
"turtle"to the HTML element's CSS class attribute.
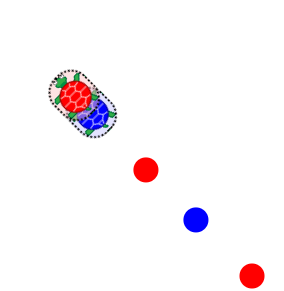
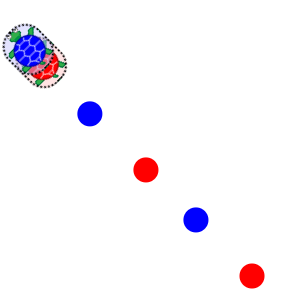
The first two steps should be self-explanatory by this point. The third step is necessary because Pencil Code identifies jQuery elements as sprites based on the class attribute. Pencil Code needs to be able to identify sprites in order to correctly time and coordinate animation queues. Of primary concern to us is the function done in the statement await done defer(). In short, done only recognizes page elements with a class property of 'turtle' as sprites. The animation queues of non-sprite page elements (in particular, <label> elements that have been identified using the jQuery function and thus otherwise seem to function as sprites) will not be affected by the statement await done defer(), potentially resulting in significant animation-queue challenges, as illustrated in
this script.
HTML class attributes and Pencil Code animations
Attributes define additional characteristics or properties of HTML elements. Many attributes apply only to a specific type of HTML element. For example, anchor elements (<a>), which are used to link to other web pages, contain an href attribute which provides the URL of the linked page; image elements (<img>) contain a filename and width and height attributes; paragraph (<p>) and span (<span>) tags can include a style attribute which give access to characteristics such as color, font-family, and font-size.
Of particular interest in this lesson are the id and class attributes. These exist as means to identify HTML elements using CSS and JavaScript. The id attribute uniquely identifies a specific element. This lesson relies on the id attribute to help select individual <label> elements, using the jQuery selector function.
The class attribute facilitates identifying a group of elements that share the same class value. As noted in the foregoing section, the class attribute is the means by which Pencil Code identifies sprites, which determines which sprites' queues should be affected are captured by calls to await done defer(). The animations of any sprite that does not have a class attribute of turtle would not be affected by calls to await done defer().
The jQuery selector function
Central to the jQuery library is the jQuery function, which facilitates using CSS selectors to select, modify, or add HTML elements on a web page that has already been rendered. For this reason, the jQuery function is called the jQuery selector function. However, this name this is a bit of an understatement, because the HTML elements that jQuery identifies are also wrapped in a jQuery object that provides additional functionality accessible via dot notation from the resulting reference. In the Pencil Code environment, which uses an extended version of jQuery called jQuery-turtle.js, this also includes all the functions that we regularly use to interact with and manipulate sprites.
The jQuery selector function has much broader use than selecting HTML elements based on a unique id attribute. It can be used to select all elements of a particular type (e.g., all <span> or all <label> elements) or all elements of a specific class (e.g., all elements with a class name of 'turtle'). It can also select elements based on other rules, such as whether an element has an attribute matching a certain value or even depending on various types of relationships between elements. This broader use of jQuery is the focus of the next lesson.
Universality of the style attribute
The style attribute can be applied to any HTML element on the screen. Thus, the jQuery css method is useful not only to modify style attributes of <label> elements, but also a range of other page elements, including sprites. The following snippet illustrates some style attributes which can be used to modify the appearance of a Turtle named b:
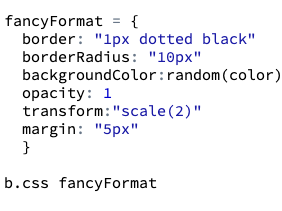

The lesson gives examples of using background-color for different page elements, including <body> and <label>. A potentially useful feature of this property is that it changes the background color without affecting anything that has been drawn on it. Thus, if you create a generic Sprite with a transparent background, e.g., t = new Sprite transparent , then subsequent calls to t.css backgroundColor:random(color) will change the background, without changing any drawing you have done on top of it using drawon, as illustrated in this script. This occurs because the <canvas> element's background is behind the "foreground" drawings that result from drawon.
The zIndex property, explored as additional activity, allows for the modifying the default layering of sprites.
What can go wrong
Formatting challenges
When working with labels and CSS properties, a whole host of formatting challenges can arise, some of which are explored in the Additional Activities. One of the biggest challenges for students is that when updating text or formatting of a <label> element, the related element appears to jump around on screen.
The issue at work here is that the location of a sprite in the underlying system is recorded with respect to the upper-left-hand corner of the underlying HTML element, rather than the center of the "sprite". When using built-in functions, Pencil Code makes all the necessary adjustments so that it seems to the end-user that sprites are positioned on their centers. However, when using css or html functions directly, the responsibility for makinmg the necessary adjustments falls to the coder. But on the bright side, it provides a good computational thinking challenge!
Misspecified ID property
A misspecified id property will not yield an error, neither when the jQuery object is first created nor when it is subsequently referenced. This is illustrated in this example program:

Attempting to assign to html and css
html and css are methods of the jQuery object. Thus, values must be passed to them as arguments. In the case of css, this argument should be an object:
myLabel.css fontWeight:"bold"
In the case of the html function, this argument should be a single string:
myLabel.html "New Text"
A common mistake when calling these functions, particularly with html, is to use assignment rather than to pass an argument, e.g.,
myLabel.html = "New Text" #THIS IS INVALID
This can be a difficult mistake to debug, because it will not update the text on screen and it will not directly lead to a warning. The assignment simply overwrites the html method with the string. Only a subsequent attempt to call the html method of that object will result in an error warning.
Side effects of css applied to turtle
Changes to the CSS settings of the default turtle, such as background color or scale, also apply to labels subsequently created by it. This is the same effect as has previously been noted with calls to functions such as grow.
Pedagogy
$
$ is an alias for jQuery. This alias is convenient not only because it it so short, but because it stands out in code. Students will be introduced to $ in subsequent lessons. This lesson does not introduce this shortcut, however, in order to reinforce the jQuery function's relationship to the underlying jQuery library, which otherwise can be too easily overlooked or insufficently appreciated.
Alternatives to "Label Recycling"
As noted in the Notes to the Add Text! lesson, Pencil Code provides alternative means by which to add text to the screen. Two options in particular stand out, owing to their ease of use: calling the write function and invoking the Sprite constructor with an HTML-text-tag argument:
hi = write "Hello!"
bye = new Sprite("<p>Goodbye!</p>"")
Aside from some technical nuances (e.g., type of page element created), these approaches yield much the same result as label, with the exception of how the text is placed on the screen. These alternative approaches have the added benefit, however, that they both return references to the generated page element, thus obviating the need for go about the comparitively complicated task of obtaining a reference through other means.
These alternatives are certainly useful and convenient. Indeed, later on in their development as web programmers, students should be (formally) introduced to them and encouraged to make use of them.
This curriculum chooses to introduce label as the means by which to add text because use of label naturally gives rise to an authentic reason to introduce jQuery selectors and the concept of page-element selection more generally. Initally, in the Add Text! lesson, use of label makes perfect intuitive sense: text is added to the document based on the position and orientation of the sprite. In the Label Formatting! lesson, students are focused primarily on CSS style properties, though they are likely to become increasingly interested in manipulating existing labels, rather than always deleting and replacing. This lesson seizes upon that interest, and in the process of explaining techniques to "recycle" labels, introduces students to a range of important related web-programming concepts.
This lesson focuses primarily on the use of the jQuery ID selector, though it also introduces the concept of element class, owing to the need to add the turtle class to "label-sprites" in order for done to function propery. The next lessons will continue to build on this foundation, using jQuery selector syntax to identify and work with collections of various types of page elements rather than individual labels.
Technicalities
jQuery and JavaScript
The jQuery library makes it easy to manipulate a page of HTML after it's displayed by the browser, and it also facilitate HTML animations. Though less of an issue today, jQuery also simplifies the process of ensuring that a program will work consistently across different web browsers (Chrome, Safari, etc.). These are some of the reasons why Pencil Code is largely built on jQuery. Much of the turtle-related function within Pencil Code are part of an extention of core jQuery functionality, Turtle Graphics for JQuery, or jquery-turtle for short.
Selecting and modifying HTML elements using pure JavaScript
This lesson illustrates how to use jQuery to gain access to an manipulate HTML elements, in particular labels. For example, the following code uses jQuery to modify the <label> element created with the statement label "example", id:"lbl",:
label "example", id:"lbl"
myJQueryLabel = jQuery("#lbl")
myJQueryLabel.text "New words!"
myJQueryLabel.css(color:red, fontSize: 50)
jQuery is a JavaScript library, and thus everything accomplished using jQuery could be coded using pure JavaScript and/or CoffeeScript (which compiles to JavaScript). The following snippet produces the same results without using jQuery:
myJsLabel = document.getElementById("lbl")
myJsLabel.innerText =  "New words!"
myJsLabel.style.color = blue
myJsLabel.style.fontSize = "50px"
Like jQuery, document.getElementById returns an object. That JavaScript object provides access to the underlying HTML element. However, it lacks all of the functionality that makes a sprite a sprite, e.g., all the functions students have used throughout this course. Many of those, particularly those involving animations, would be tremendously difficult to replicate in pure JavaScript.
jQuery: a constructor function
Because jQuery returns an object (the jQuery wrapper object) it is classified as a constructor function. Typically, constructor functions are called with the new keyword, such as when we instantiate new sprites, e.g., new Turtle. In the case of jQuery, when you call jQuery(someString), internally jQuery effectively translates this to new jQuery(someString). (To be painfully precise, it's actually invoking new jQuery.prototype.init(someString), but for our purposes the effect is the same.)
jQuery html vs. text method
jQuery's text method provides an alternative to the html method introduced in this lesson. The former only gives access to the text node of the HTML element, whereas the latter gives access to the HTML element node, which contains that text node. The benefit to using html is that you can embed tags such as <em> or <b>, and even <span> tags (with their own id and/or style attributes).
In web programming more generally, however, text is preferred over html. Stylistically, embedded markups such as <em> or <b> are not in sync with modern web-programming best practices. More importantly, however, is that use of html is discouraged in because of a potential in specific situations for a hacking vulnerability known as a Cross Site Scripting (XSS) attacks (though that is not a concern on the Pencil Code platform).
For more details, see this resource from the Open Web Application Security Project.
