Teacher's Guide: Add More Turtles!
Overview
This lesson introduces the concept of a sprite. It focuses on using the Turtle constructor and dot notation to create and manipulate multiple sprites in a single program. The three lessons following this one address sprites more generally, including creating custom sprites and using images.
This lesson also gently introduces the concept of the animation queue, a feature which can significantly impact the behavior of sprites on screen.
More about the lesson
Constructors and dot notation
Adding additional turtles is straightforward, involving nothing more than a call to new Turtle(). Assign a variable name to the new turtle, e.g.,
myTurtle = new Turtle()
in order to be able to reference it in subsequent lines of code, via dot notation.
Turtle itself is an example of a special type of function called a constructor. By convention, constructor names begin with capital letters. Constructors are used to create objects with a particular initial set of properties and values. (Objects will be discussed in greater detail beginning with the lesson Date Objects!.) In this case, the object is another turtle sprite, and its properties establish its image, color, location, size, and orientation on the screen, as well as all the functions available to Pencil Code sprites, such as fd, rt, and pen.
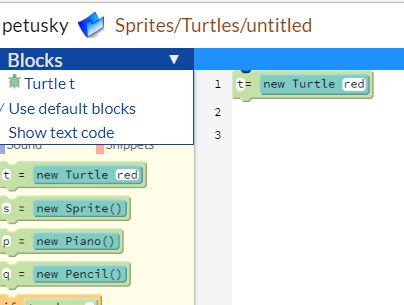
Students using blocks (rather than coding in text) will notice that after adding a constructor, the Blocks menu will change to allow them to select the block for the turtle of their choice, as shown in the screenshot below. In that example, the user has the option of "Use default blocks" (point to the default turtle) or "Turtle t":
For students who opt to type their code, encourage putting the function call immediately after the period, rather leaving a space after it. For example, r. fd 100 and r.fd 100 are both syntactically valid, but the latter is preferred from a style standpoint.
Many of the functions that have been used thus far are sprite-specific, and thus can be used with dot notation. These include: rt, lt, fd, bk, dot, pen, pu, pd, fill, show, st, hide, ht, home, pause, and speed. The speed function is special in that when used for the default turtle, it sets the default speed of all sprites. This setting can be overridden for individual sprites using dot notation for that specific sprite. Once a specific sprite's default speed has been overridden, changes to the default turtle's speed no longer affect its speed.
Animation queue
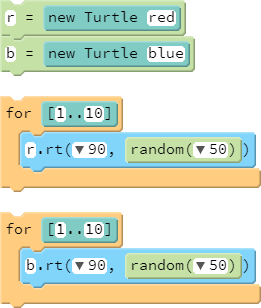
With the addition of more turtles, students first encounter situations in which the execution of statements onscreen does not match the order in which statements appear in their source code. A simple example involves two parallel loops with code for two different sprites.
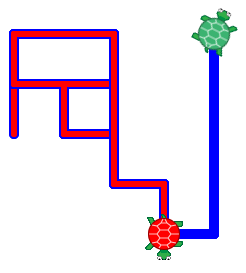
A student would typically expect the red turtle to move 10 times, and, once its finished, the blue turtle would move. However, these turtles will move in tandem. The reason for this is that execution of statements in a program does not necessarily determine how Pencil Code processes animation. This is a manifestation of Pencil Code's use of jQuery animation queues.
The Pencil Code reference provides useful details about animation queues:
An animation queue is a list of tasks that an object needs to do in the future, like a schedule. It tells the object what it needs to do in the order it needs to do them, and each object's queue is (by default) independent of every other object.
Additionally:
Pencil Code actually runs all the code that sets up an animation at once before the animation begins. Then it displays the animated results after the program finishes by using animation queues.
For the purpose of this lesson, the key takeaway is that individual sprites have their own queues, which are all displayed in parallel. This is what leads to the results illustrated above, i.e., that the order of statements in a script don't always agree with the order in which they are executed.
There are several functions that modify the way the queues are created and run. This lesson introduces sync. Later lessons (beginning with Array Destructuring!) will explore other functions that affect the queue, including speed, plan, done, await, and defer.
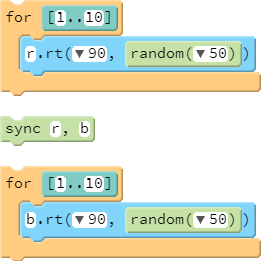
sync provides a straightforward way to affect the queue. In the example with two loops, one can force the second loop to wait for the first loop to finish by adding the following call to sync between the two loops:
As noted in the handout, a call to sync prevents referenced sprites (here, r and b) from executing functions that appear after the call to sync, until each and every one of them executed all functions invoked prior to the call to sync.
Notes to Activities
The activities in this lesson are straightforward. As always, encourage students to come up with their own variations on the activities, rather than simply mimicking the provided solution. For example, for TurtleRace, students might draw a road for the turtles to run on, complete with a yellow line down the middle. This doesn't just make coding more personalized and fun, but it also encourages students to apply previously learnt material in new ways, thereby reinforcing those concepts and continuing to build computational thinking skills.
Note that TurtleRace will be revisited a number of times in subsequent lessons, adding additional features that students may well inquire about, such as determining a winner and forcing turtles to stop when they reach the finish line.
Additional activities
- Create two scripts in which two turtles follow the same randomly generated path, but the second one follows a few "seconds" behind (i.e.,
pauseis the key to this activity). In the first program, Sweeper, have the second turtle erase the line that the lead turtle draws. In the second program, Outliner, have the second turtle draw a thinner line of a different color. - Use techniques similar to those used in SpinArt to create a YinAndYang script.
Beyond the lesson
Frame-based versus queue-based animation
The queue-based animation encountered thus far in this curriculum is one of two alternatives. The other is frame-based animation. The Pencil Code reference describes the two approaches and contrasts the pros and cons to each. These topics will be addressed in a variety of future lessons.
wear
In addition to the 149 defined colors and rgb codes, wear accepts inputs which allow the user to specify characteristics such as the size of the sprite or to add an image. These features of wear will be discussed in the Images! lesson.
Alternative sprite shapes
Pencil Code provdies access to several colored sprite shapes other than a turtle: a pencil, a pointer, a dot, and a point. Adopt the desired color and shape using wear with a string argument, in the form of wear("color shape"); for example, wear("red pencil") or wear("cyan pointer"). To adopt a red turtle icon, use wear("red turtle") or simply wear("red").
Duplicating turtles
In a discussion of variable references, the notes to the Variables! lesson explained that, given a turtle referenced by a variable x, the statement y=x does not create a copy of the turtle referenced by x, but rather the reference itself. The result is two variables that point to the same sprite.
In general, to create a copy of a Javascript object, one must first create a new object and then copy over all properties of the original. (Objects will be addressed in greater depth beginning with the Date Objects! lesson.) However, Pencil Code facilitates the duplication of an existing sprite using the copy method, e.g., twin = turtle.copy(). The duplicate is a distinct object (i.e., a separate instance), but matches the original's color, location, orientation, and other characteristics.
What can go wrong
Syntax errors
When creating and working with additional sprites, simple syntax errors are typically students' biggest problem. Common mistakes include failing to capitalize the T in new Turtle, subsequently misspelling the variable name that references a sprite, failing to appropriately use a dot notation when needed, or using dot notation where it does not belong.
Perhaps the most common error related to dot notation occurs when students attempt to code for in a sprite-specific manner (e.g., t.for [1..5]). for is a flow control operator, not a function of a turtle object. It should not (in fact, cannot) be called using dot notation.
Pedagogy
Animation
Other sections of this document have referred to frame-based versus queue-based animation, identified some challenges with working with the queue-based approach, and hinted at more to come. At some point, students will learn that they can sidestep many animation-queue issues by switching to a frame-based approach, either by using speed Infinity or the Pencil Code forever function (introduced much later, in Forever!). The fact that frame-based animation can make things easier raises the question: Why adopt it in the first place? Why not immediately adopt a frame-based approach, as alternative educational coding environments do, such as Scratch or Processing? The answer to these questions has much to do with pedagogical tradeoffs.
This curriculum postpones the introduction of frame-based animation for several reasons. First, the queue-based approach, prior to using multiple sprites, is conceptually simpler and intuitive. Students focus on underlying programming constructs, such as variables and flow control, and fundamental computational thinking skills. Second, frame-based animation is not a panacea. For example, when using forever loops with event polling or event binding, timing problems still arise. In short, students trade of one set of conceptual difficulties for another, with the frame-based set often being even harder to sort out. Lastly, in the case of the forever function, its use involves the use of advanced coding constructs which students foundationally are not yet prepared. In particular, forever requires students to define and use custom functions, called callbacks. Defining functions is an expansive topic, ranging from arguments to return types, and which involves many other challenging coding features, such as variable scope.
The underlying tenets of this curriculum include building up student knowledge step by step and not taking shortcuts. Working first with queue-based animation supports this approach. Admittedly, some aspects of queue-based animations present students with conceptual challenges, but these are surmountable. And working through these challenges and concepts is a beneficial activity in its own right.
Ultimately, students will work through both approaches, and see the relative advantages and disadvantages of each, and know when one is the more appropriate framework than the other.
Technicalities
Eliminating sprites
Calling the cs function seems to delete all Turtles except the default turtle. Technically, however, the sprites continue to exist after this call to cs, but they are moved to the top-left corner of the visible window, are no longer visible, and cannot be made visible again through calls to st.
In some cases, it may be desireable to completely eliminate a sprite. For example, doing so can help free up memory resources and thereby improve performance in programs with numerous sprites.
Completely eliminating a sprite once it is created necessitates eliminating all references to the sprite. At a minimum, the sprite must be removed from the global jQuery object, to which all sprites are automatically added. This is accomplished using the remove function, e.g., myTurtle.remove(). Additionally, any other variables referencing the sprite must be reassigned. Typically, this is done by assigning the variable to undefined, e.g., myTurtle = undefined.
Functions versus methods
When a property of an object is a function, that function is referred to as a method. The notes to the Dot Art! Lesson explain this curriculum's decision to not draw that distinction for students until much later in the course. However, now that dot-notation is introduced, one might argue that it now makes sense to add terminology of methods. However, little is lost by continuing to rely solely on the term function, as the difference does not become truly meaningful until students learn more formally about adding fuctions to custom objects of their own.
Global accessibility of the default turtle's methods
In this lesson, students learn to reference sprites using dot notation. The default turtle is special in that its functions can be called without referring explicitly to turtle. This is a feature built in to Pencil Code to simplify manipulation of the turtle by novice coders.
A thorough explanation of how Pencil Code accomplishes this involves a deeper understanding of Javascript objects and also of variable scope, issues that will be taken up in depth in subsequent lessons. However, the general idea is not too hard to grasp. It begins with the fact that Pencil Code turtles are custom Javascript objects. The functions used to manipulate turtles are stored as properties of each turtle instance. Like all object properties, such functions (more formally called methods) are typically only accessible via dot-notation. However, in the case of the default turtle, Pencil Code creates aliases for these functions that can be accessed anywhere in the program.
Constructors and prototypes, instances and classes
The lesson notes that constructors are special functions that are called with the new operator: new Turtle creates an new turtle instance, a custom object with properties based on an underlying prototype.
There is much more that can be said about about constructors and related concepts, beginning with the fact that JavaScript is a prototype-based language rather than an object-oriented language. This curriculum will take up the topic in future lessons on classes and prototypes. In the meantime, interested readers are referred to external resources, including MDN web docs: Details of the object model and Chapter 3 of "The Little Book on CoffeeScript".
