Teacher's Guide: Calling All $(".turtle")s!
Overview
This lesson describes how to use the jQuery function to select collections of page elements based on class or page element type and how to use jQuery to manipulate individual page elements as sprites.
More about the lesson
jQuery is a versatile JavaScript library that makes it easier to navigate an HTML document, select Document Object Model (DOM) elements, create animations, handle events, and develop Ajax applications. For this reason, jQuery has long been the most widely deployed JavaScript library. This lesson focuses on jQuery's DOM selection and manipulation features, extending features first introduced in the previous lesson, Label Recycling!. More simply stated, this lesson shows students how to use jQuery to identify elements in an HTML page, such as <body> or a collection of all <label> elements, and to subsequently manipulate these page elements as sprites.
This lesson introduces the $ alias for jQuery. The previous lesson used the latter name in order both to reinforce its relationship to the underlying jQuery library and also to help avoid the misconception that it is a special operator, in impression that the $ symbol is apt to make. However, there are benefits to using $ rather than jQuery: it is more convenient to type, it tends to stands out in code, and it is the variable name that students will encounter in others' code. Students should adopt the use of $ now as well—but don't let them lose sight of the fact that they are still working with a normal function, abeit a powerful one (with a rather unusual name).
However, in the following notes, when referring to the jQuery function in explanations, the longer form (jQuery) will be used as that arguably benefits readability of prose.
Element selection
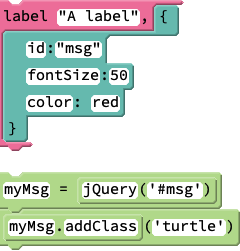
To use jQuery to select HTML page elements, pass it a string argument representing a selection criterion. Students previously encountered jQuery id-selector syntax in the Label Recycling! lesson. To select an element by id, pass jQuery a string argument that lists the id property of a specific HTML element prefaced with #. jQuery element-selector syntax and class-selector syntax, introduced in this lesson, work analogously, as illustrated below.
| Selector syntax | Example |
|---|---|
id-selector:
|
|
element-selector:
|
class-selector:
|
jQuery objects
Every call to jQuery returns a JavaScript object. This object, a so-called jQuery object, contains references to each of the individual HTML elements on the web page that match a particular search criterion. The jQuery object includes over 140 standard jQuery methods. In Pencil Code, the jQuery object includes dozens of additional methods, defined in the jQuery-turtle library, that provide additional Pencil Code-specific features, including most of the functions used to manipulate sprites. In short, these jQuery-object features are what makes a sprite a sprite, with all the many functions we can access to manipulate them using standard dot-notation.
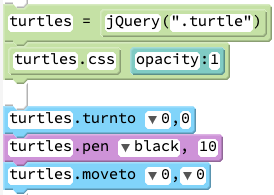
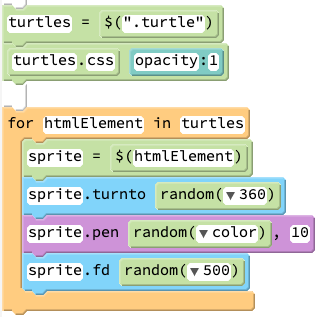
When multiple page elements are referenced by a single jQuery object, function calls on that object (such as fd or pen) apply to all of the page elements referenced by that object. This is illustrated in the class-selector and element-selector examples above. When accessed in this fashion, referenced jQuery objects all act in unison. However, it is often desirable to work with the elements referenced in a jQuery object individually. For example, rather than assign a single pen color to all elements with class turtle, one might want to assign a different color to each sprite.
The Notes to the Custom Objects! lesson describes how to use an alternative form of the for loop (i.e., for x of) to iterate over elements in a standard JavaScript object. Fortunately, jQuery objects are structured in a special, array-like fashion, and thus we can iterative over these collections as we would standard JavaScript arrays. For the purposes of this lesson, this means iterating over its page-element references using a standard for x in loop. More generally, the array-like structure of jQuery objects means that individual elements can be conveniently accessed using subscripts—a standard coding language feature addressed in the Subscripting! lesson.
Iteration over page-element references in a jQuery obejct is straightforward, but there are two important caveats. First, as noted in the lesson, the page-element references in the jQuery object are not themselves jQuery objects. Thus, they will not have the functionalies of sprites. However, they can easily be converted to jQuery objects (and therefore to sprites), by passing each individual reference to the jQuery function, as illustrated in the example below. In common parlance, jQuery is said to wrap these features around the page element.
Second, recall from the previous lesson that sprites created using jQuery differ in one important way from those created with a constructor, such as Turtle or Sprite: they are not assigned a class property value of 'turtle', and thus they will not be properly identified by the Pencil Code functions sync. To adjust for this difference, simply pass the the turtle class property to the jQuery object, using the addClass property, e.g., msgLbl.addClass('turtle').
Be aware that 'turtle' is the class value Pencil Code uses to identify any sprite, include those created with the Sprite, Piano, or Pencil constructors, not just Turtle. Thus, the statement jQuery(".turtle").fd 100, which utilizes class-selector syntax, moves
Notes to activities
The SetTheScene activity instructs students to set the CSS background-image property, and provides an example of the value that might be assigned. Careful inspection of the example will reveal that this string contains embedded quotes. These require special care: either use a combination of single and double quotes (as illustrated in the lesson example) or preface quotes that appear within the string using the escape character, \, e.g.,
"url(\"https://www.pngall.com/wp-content/uploads/2016/07/Space-PNG-HD.png\")"
There are a number of additional properties related to background-image that allow for greater control over how the background image appears, such as background-repeat and background-size. Consult the w3schools HTML Background Images reference page for details.
Additional activities
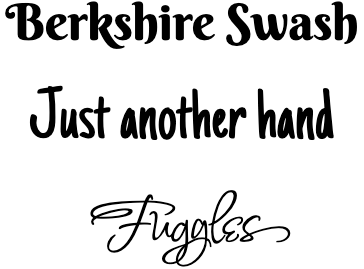
GoogleFonts: Spruce up the text in your labels using one of the many font styles available at https://fonts.google.com/.
To access a Google font in your script, you must first to add a
<link>element to the HTML DOM.<link>elements are used to define a relationship between an HTML document and an external resource, most commonly to external CSS stylesheets, which is precisely the case here. Add the Google font stylesheet of your choice to the<head>element using the CSSappendmethod, following this syntax for the "Just Another Hand" font:$('head').append('<link rel="stylesheet" href="//fonts.googleapis.com/css?family=Just+Another+Hand:300,400,600,700&lang=en" />')After you have executed this line of code, you can reference this
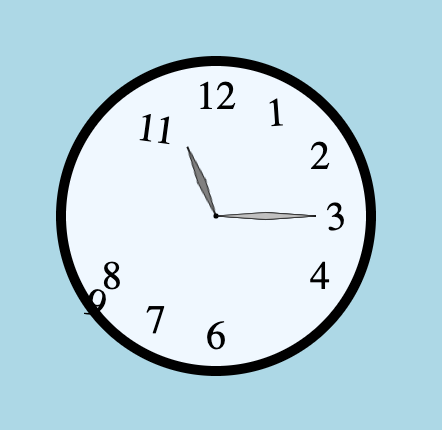
font-familyas you would any other.OyVeyClock: Create a correctly-set clock that subsequently falls to pieces. Do this efficiently by iterating over the collection of labels, which you should identify using jQuery element-selector syntax.
StarterWebPage: The Pencil Code
writefunction allows us to add HTML elements to the screen following the normal flow of the page, which means it positions elements the first element in top left corner of the screen and with subsequent elements below it.writeis described in the Notes to the Add Text! lesson. By default,writeadds<div>elements, but you can override that by specifying an HTML tag in the string you pass to it. For example,write "<h1>Example</h1>"creates an HTML header tag.Use
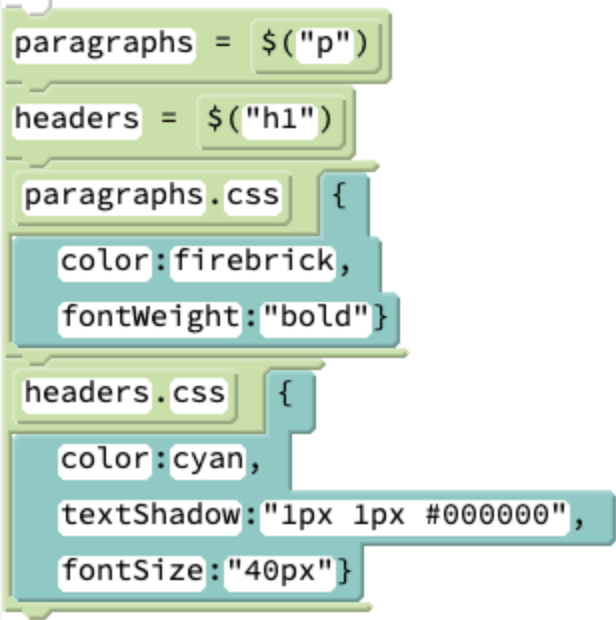
writeto create a simple web page consisting of a header (using <h1>) and several paragraphs (using the <p> tag). Then reformat the tags by setting the CSS properties for each of the classes.The Pencil Code documentation states that the
typeboxfunction "draws a colored box as typewriter output," but this is a bit misleading, astypeboxdoes not actually add anything to the background canvas element. Rather, calls totypeboxadd <div> elements to the web page. Similar to thelabelfunction, thetypeboxfunction does not return a reference to the page element it creates. For this activity, usetypeboxto create your own initial TypeboxArt design. Then use jQuery to access all <div> elements on the page so that you can manipulate and change your art by modifying such CSS attrributes as margin, border, border-radius, width, height, or rotate.
(<head> and <link> elements will be explored in depth in the Using your <head>! lesson.)
You may notice that programs involving loaded fonts sometimes don't render (i.e., print to screen) correctly when you run your script, especially when you first run your program. A simple workaround is just to reload the page, which is likely (but not guaranteed) to get the result you expected. The underlying issue is that the fonts load asyncronously, a concept which will be addressed in the IO! lesson. After the first time the program runs, the font data are cached, meaning they are stored locally in your browser, which results in them loading faster on subsequent runs.
Beyond the lesson
Additional jQuery CSS selectors
This lessons has shown that the jQuery selector function has much broader use than selecting HTML elements based on a unique id attribute. It can be used to select all elements of a particular type (e.g., all <p>, <span>, or <label> elements) or all elements of a specific class (e.g., all elements with a class name of turtle). jQuery can also select elements based on more nuanced rules, such as whether an element has an attribute matching a certain value or even depending on various types of relationships between elements, such as selecting <span> elements nested within <label> elements. An extensive list of selectors and their syntax is provided by w3schools.com. An example of the use of the :hidden and :visible selectors is provided in this script. Another option is to submit a space-delimited string of selectors within a single call to jQuery. For example, $(".turtle .turtlelabel") selects all sprites and all labels created using the sprite label method.
jQuery not selector
The jQuery not selector is a convenient way to remove elements from the set of matched elements. For example, to select all sprites except the default turtle, simply add the exclusion to a previous selection:
$(".turtle").not("#turtle")or, equivalently,
$(".turtle").not(turtle)Note that, using dot notation, we can continue to chain expressions such as these, applying additional methods to the element or set of elements, e.g., $(".turtle").not(turtle).home(). This method-chaining feature will be particularly useful when working with functions that take callbacks as an argument, as these also facilitate providing differentiated instruction to different elements in the resulting collection (i.e., without using explicit iteration). Two examples that students will soon encounter are the event binding function click (introduced in Mouse Events!) and each (introduced in the notes to the Callbacks! lesson).
Pencil Code filters: within, notwithin, nearest
Pencil Code provides several jQuery enhancements to facilitate selecting from a collection of page elements based on location on the screen. These enhancements are described as filters because they select one or more elements (or none) from a collection. nearest filters elements to the one nearest the given location; within filters elements to those within distance of a location; and notwithin filters elements beyond a given distance of a location. In general, the location can be specified as an array of center-based coordinate values or as an HTML coordinate object; nearest will also accept a sprite. The syntax of each method is straighforward; some examples are provided below.
# select page elements of sprites further than 150
# units from the default turtle
insiders = $('.turtle').notwithin(150,turtle.getxy())

# select page elements of sprites within 300 units
# of the center of the screen
outsiders = $('.turtle').within(300, [0,0])

# recolor all sprites within 300 of the default turtle
# (including turtle)
$('.turtle').within(300, turtle.getxy()).wear(black)

# recolor the sprite closest to the default turtle
# (excluding turtle)
$('.turtle').not(turtle).nearest(turtle).wear random(color)

# increase the size of the the sprite closest to the top
# right corner of the screen
[w,h] = sizexy()
$('.turtle').nearest([w/2,h/2]).grow(3)
remove
The jQuery remove method removes all HTML elements it references from the DOM. For example, turtle.remove() removes the default turtle, and $("label").remove() removes all <label> elements.
Though it removes HTML page elements, the jQuery object on which remove was called still exists, and thus subsequent references to that object will oftentimes continue to function, though likely not as might be expected. Oftentimes, it is helpful to "complete the removal process", by eliminating the jQuery object—the remnants of the sprite which previously included a page element but now no longer does. To do this, you must also elminate all references to the jQuery object in JavaScript, a task that is often easier said than done. As a simple example, to remove the turtle sprite created with the code t = new Turtle, execute, at a minimum, both t.remove() and t=undefined. The challenge is that any references to t from within previously-created collections need to be purged as well.
This sample script illustrates some of the difficulties, though a full explanation (in particular, how to remove specific items from a collection) is beyond the scope of this lesson.
What can go wrong
<label> elements from the Test Panel
If you have written to the test panel e.g., using see, or if you have typed in the test panel, the system reponses are created as <label> elements. Thus, jQuery collections created with calls to $("label") will include these page elements as well as those generated using the label function.
Remember to traverse jQuery collections
A common mistake is to attempt to manipulate the individual elements of a collection by passing a random argument to a method of that collection, such as with turtles.rt random(360). However, this statement will result in all of the elements getting turned by the same random value, rather than each turning its own amount. You need to traverse the collection to differentiate. Additionally, when the collection was created with a call to jQuery, each referened element of that collection must be wrapped in a jQuery object, i.e.,
for t in turtles
  $(t).rt random(360)
Sprites in my jQuery collection are missing properties
When using the jQuery selector function on existing sprites, the collection formed contains HTML page element objects, not the previously-existing jQuery objects. As the lesson shows, we have to use $ to wrap individual elements of the collection in (new) jQuery objects. This new object is a sprite—it is a jQuery object with class attribute 'turtle'—but it is not the same sprite, as it is a separate instance of jQuery object. While this new sprite could be an equivalent object, that will not always be the case. In particular, if the original sprite (i.e., the jQuery object) had additional properties added to it, those additional object properties will be missing in the new sprite. For example, consider the following code:
t = new Turtle(red)
t.color = red

newT = $(t)
newT.dot newT.color, 100   # produces a black dot,
                           # b/c newT.color is undefined
The new jQuery object, newT, does not have a color property, because color is a property of the original jQuery object (referenced by t), not an attribute of the underlying HTML object.
The upshot is that when selecting elements with jQuery, we need to make sure that the underlying HTML element contains all information that we want associated with that element. It takes some more work, but the good news is that, so long as this information can be expressed as text, there is a simple solution: add it as a class attribute of the HTML element, then access that information from the new wrapper object once it is created. The following simple example illustrates this solution:
t = new Turtle(red)
t.color = red
t.addClass(t.color) # concatenates "red" to the class
                    # attribute, which is now "turtle red"
newT = $(t)
newT.color = newT.attr("class").substring(7)

newT.dot newT.color, 100  #produces a red dot
The foregoing example uses the jQuery addClass method to add the color as a class attribute of the sprite. Once the new sprite is created, it accesses the class property using the jQuery attr method.
An more extensive example of this technique is provided in this script.
Technicalities
Array-like ≠ Array!
jQuery objects behave much like arrays, and are therefore described as being array-like. In more technical terms, being array-like means that the jQuery object contains zero or more indexes (properties which names are positive integers starting with zero) as well as a length property, which allow the objects to be accessed using a for x in traversal of the collection, as illustrated in the lesson.
Individual elements of a jQuery collection can also be accessed using subscripts (as with Arrays) or using the jQuery get method. Students will encounter these latter two approaches in later lessons; three functionally equivalent approaches to iterate over a jQuery collection (and access the elements as sprites) are provided in the following example:
for pageElement in turtles
  sprite = $(pageElement)

for i in [0...turtles.length]
  pageElement = turtles.get(i)
  sprite = $(pageElement)

for i in [0...turtles.length]
  pageElement = turtles[i]
  sprite = $(pageElement)
jQuery also facilitates differentiated manipulation of elements in a jQuery object using the each method, as illustrated in this script. This approach requires a knowledge of callbacks (a function passed as an argument to another function or method) and the this keyword, topics addressed in this curriculum after students have studied custom functions.
Selecting and modifying HTML elements using pure JavaScript
jQuery is a JavaScript library, and thus everything accomplished using jQuery could be coded using pure JavaScript. The notes to the Label Recycling! lesson provided an example of selecting and manipulating HTML elements by id without resorting to jQuery. Naturally, we can also use pure JavaScript to access by class or by element type, a.k.a. tag. In all cases, the starting point for selecting page elements is the document variable. This references a JavaScript Document object which provides a connection to the underlying HTML Document Object Model.
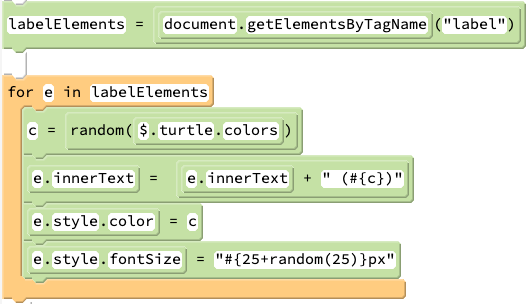
To select an element by id, use document's getElementById method. To select one or more elements by class name, use the getElementsByTagName method, and to select based on class, use getElementsByClass. The following coding snippet illustrates one example of using "pure JavaScript" (expressed here in the syntactically-simplified CoffeeScript equivalent); it selects all <label> elements and changes their appearance:
document.getElementByID and the other two methods discussed in this section return references to JavaScript objects that provide access to the underlying HTML elements on the page. Naturally, these objects are not jQuery objects, and thus they lack all of the extra functionality needed to make a sprite a sprite. We can choose to manipulate them using plain JavaScript, as illustrated in the exmaple above; alternatively, we can turn these objects to jQuery objects by passing them to the jQuery function.
Update: JavaScript Selectors API
When jQuery was first created, it greatly simplified the identification of page elements and also provided useful methods to work with these collections. jQuery continues to offer such advantages, but successive updates to JavaScript have incorporated changes that have narrowed the gap.
For many years, element selection in JavaScript was accomplished using the page element methods getElementByID, getElementByTagName, and getElementByClassName. Given the unique nature of element IDs, the first of these three tools returns at most a single page element. The latter two each return an array-like object of all child elements matching the given tag or given class name(s).
A more recent addition to JavaScript is the Selectors API, which includes the querySelectorAll method. This method is similar in many ways to the jQuery selectors introduced in this lesson. For more details, see this MDN document. querySelectorAll returns a NodeList object. Though this type of collection is not an Array, it can be converted to a real Array using Array.from().
As a final note, be aware that there are some important differences in the return values of the "classic" JavaScript selectors and the newer variants from the Selectors API. getElementByTagName and getElementByClassName return live HTMLCollection objects. Live collections continually update to to reflect changes in the DOM as the changes occur. Thus, if an element in a collection no longer qualifies for the selector used to create it, it will automatically be removed and new elements will likewise be added. (This has important potential implications for actions involving iteration over these collections.) In contrast, querySelectorAll returns a static NodeList object. The qualifier "static" means that subsequent changes in the DOM do not affect the content of the collection.
